Hyundai Genesis (DH): Automatic Transmission Control System / Shift Cable Repair procedures
Hyundai Genesis (DH) 2013-2016 Service Manual / Automatic Transmission System (SBC) / Automatic Transmission Control System / Shift Cable Repair procedures
| Removal |
| 1. |
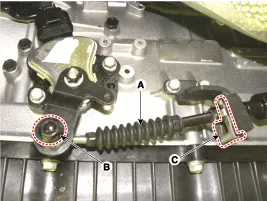
Remove the nut (B) and clip (C). |
| 2. |
Remove the shift cable (A) assembly from the transmission.
|
| 3. |
Remove the floor console.
(Refer to Body-"Floor Console") |
| 4. |
Disconnect the shift cable (A) from the shift lever.
|
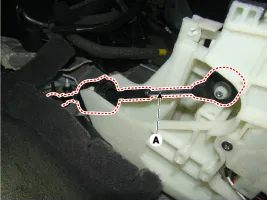
| 5. |
Remove the shift cable assembly (B) by removing the nuts (A).
|

| 6. |
Pull the rubber plug from the floor and pull out the shift cable assembly.
|
| Installation |
| 1. |
To install, reverse the removal procedure. |
| Adjustment |
| How to Adjust Shift Cable |
| 1. |
Insert the shift cable to the bracket and hold it with a new clip. |
| 2. |
Align the manual lever hole to the hole on the transmission case and hold the position with a bar. |
| 3. |
Eliminate shift cable free play of the shift cable. |
| 4. |
Firmly hold the special bolt with a wrench and tighten the nut(A) to the specified torque.
|

| 5. |
Take off the bar holding the manual lever. |
| 6. |
Shifting each position, check if the shift lever moves smoothly. |
Components 1. Shift lever knob2. Shift lever boots3. Shift lever assembly4. Shift cable
Other information:
Hyundai Genesis (DH) 2013-2016 Service Manual: Blind Spot Detection Indicator Components and Components Location
C
Hyundai Genesis (DH) 2013-2016 Service Manual: Condenser Repair procedures
Inspection 1. Check the condenser fins for clogging and damage. If they are clogged, clean them with water, and blow them with compressed air. If they are bent, gently bend them using a screwdriver or pliers. 2. Check the condenser connections for leakage, and repair or replace it, if required.
Categories
- Manuals Home
- Hyundai Genesis Owners Manual
- Hyundai Genesis Service Manual
- Front Door
- Emission Control System
- Steering System
- New on site
- Most important about car

Copyright © 2026 www.hgenesisdh.com - 0.0309