Hyundai Genesis (DH): Lighting System / Overhead Console Lamp Repair procedures
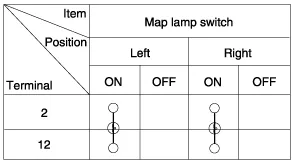
| Inspection |
| 1. |
Remove the overhead console lamp assembly and check for
continuity between terminals. If the continuity is not as specified,
replace the map lamp switch.
|

| Removal |
| 1. |
Disconnect the negative (-) battery terminal. |
| 2. |
Remove the mounting screws (2EA).
And then remove the overhead console (A).
|
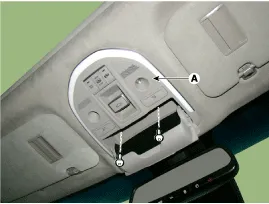
| 3. |
Remove the overhead console after disconnecting the connector (A).
|

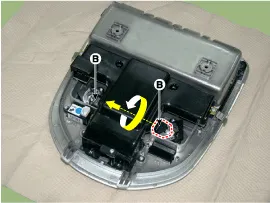
| 4. |
Remove the overhead console lamp (B) by turning the socket.
|
| Installation |
| 1. |
Install the overhead console lamp after connecting the connector. |
| 2. |
Install the lens after tightening 2 screws. |
Removal 1. Disconnect the negative (-) battery terminal. 2. Separate the room lamp (B) from the roof trim after disengaging the mounting clip (A).
Removal 1. Disconnect the negative (-) battery terminal. 2. Remove the front door trim. (Refer to Body - "Front Door Trim") 3. Disconnect the door mood lamp connectors (A).
Other information:
Hyundai Genesis (DH) 2013-2016 Service Manual: Auto Defogging Actuator Description and Operation
Description The auto defogging sensor is installed on front window glass. The sensor judges and sends signal if moisture occurs to blow out wind for defogging. The air conditioner control module receives a signal from the sensor and restrains moisture and eliminates defog by the intake actuator, A/C, auto defogging actuator, blower motor
Hyundai Genesis (DH) 2013-2016 Service Manual: Climate Control Air Filter Repair procedures
Replacement 1. Remove both stoppers (B) by turning them from the glove box (A). 2. Disconnect the air damper (A) from the glove box (B). 3. Remove the filter cover (A) by pressing the knob. 4. Replace the air filter (A) with a new one according to the direction of air filter.
Categories
- Manuals Home
- Hyundai Genesis Owners Manual
- Hyundai Genesis Service Manual
- Repair procedures
- Body (Interior and Exterior)
- Emission Control System
- New on site
- Most important about car
