Hyundai Genesis (DH): Air Conditioning System / CO2 Sensor Repair procedures
Hyundai Genesis (DH) 2013-2016 Service Manual / Heating, Ventilation and Air Conditioning / Air Conditioning System / CO2 Sensor Repair procedures
| Replacement |
| 1. |
Disconnect the negative (-) battery terminal. |
| 2. |
Remove the crash pad under cover [RH].
(Refer to Body - "Crash Pad Under Cover") |
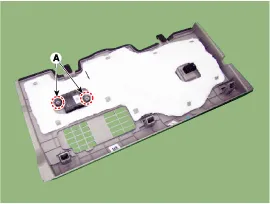
| 3. |
After loosening the mounting screws, remove the CO2 sensor (A).
|

Interface Diagram
Description The auto defogging sensor is installed on the front window glass. The sensor judges and sends signal if moisture occurs to blow out wind for defogging.
Other information:
Hyundai Genesis (DH) 2013-2016 Service Manual: A/C Pressure Transducer Description and Operation
Description The A/C Pressure Transducer (APT) converts the pressure value of high-pressure line into voltage value after measuring it. By converted voltage value, engine ECU controls the cooling fan by operating it at high speed or low speed.
Hyundai Genesis (DH) 2013-2016 Service Manual: Heater & A/C Control Unit Repair procedures
Self Diagnosis 1. Self-diagnosis process 2. How to read self-diagnostic code After the display panel blinks three times every 0.5 second, the corresponding fault code blinks on the setup temperature display panel every 0.5 second and will show two figures.
Categories
- Manuals Home
- Hyundai Genesis Owners Manual
- Hyundai Genesis Service Manual
- Steering System
- Parking Assist Sensor Repair procedures
- Engine Electrical System
- New on site
- Most important about car

Copyright © 2026 www.hgenesisdh.com - 0.023