Hyundai Genesis: Timing System / Timing Chain Cover Repair procedures

Removal
1.
Remove the lower oil pan.
(Refer to Lubrication System - "Oil Pan")
2.
Drain the coolant.
(Refer to Cooling System - "Coolant")
3.
Remove the air cleaner assembly.
(Refer to Intake And Exhaust System - "Air Cleaner")
4.
Remove the surge tank.
(Refer to Intake And Exhaust System - "Surge Tank")
5.
Remove the intake manifold.
(Refer to Intake And Exhaust System - "Intake Manifold")
6.
Remove the LH/RH cylinder head cover.
(Refer to Cylinder Head Assembly - "Cylinder Head Cover")
7.
Remove the drive belt.
(Refer to Timing System - "Drive Belt")
8.
Remove the idler.
(Refer to Timing System - "Idler")
9.
Remove the drive belt auto tensioner.
(Refer to Timing System - "Drive Belt Tensioner")
10.
Remove the oil filter body.
(Refer to Lubrication System - "Oil Filter Body")
11.
Remove the crankshaft damper pulley.
(Refer to Timing System - "Crankshaft Damper Pulley")
12.
Remove the water pump.
(Refer to Cooling System - "Water Pump")
13.
Remove the timing chain cover (A).
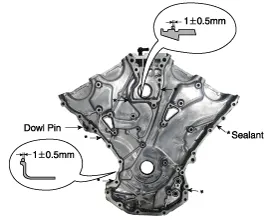
   
Be careful not to damage the contact surfaces of cylinder block, cylinder head and timing chain cover.
Installation
1.
Install the timing chain cover.
(1)
The sealant locations on chain cover and on counter parts (cylinder head, cylinder block, and lower oil pan) must be free of engine oil and etc.
(2)
Before assembling the timing chain cover, the liquid sealant THREE BOND 1217H should be applied on the gap between cylinder head and cylinder block. The part must be assembled within 5 minutes after sealant was applied.

Bead width : 2.5 mm (0.1 in.)

(3)
Apply liquid sealant THREE BOND1217H on timing chain cover. The part must be assembled within 5 minutes after sealant was applied. Sealant should be applied without discontinuity.

   
Fill the T-joint area (6EA *) with sealant.
Apply sealant all around the dowel pin hole (2EA).
(4)
Install the new gasket (A) to the timing chain cover.
Always use a new gasket.

   
During timing cover installation, be careful not to take off applied sealant on the timing cover by contacting other parts.
(5)
The dowel pins on the cylinder block and holes on the timing chain cover should be used as a reference in order to assemble the timing chain cover to be in the exact position.

Tightening torque
A (19EA) :
18.6 ~ 21.6 N.m (1.9 ~ 2.2 kgf.m, 13.7 ~ 15.9 lb-ft)
B (2EA) :
24.5 ~ 26.5 N.m (2.5 ~ 2.7 kgf.m, 18.1 ~ 19.5 lb-ft)
C (2EA) :
58.8 ~ 68.8 N.m (6.0 ~ 7.0 kgf.m, 43.4 ~ 50.6 lb-ft)
D (3EA) :
9.8 ~ 11.8 N.m (1.0 ~ 1.2 kgf.m, 7.2 ~ 8.7 lb-ft)

(6)
Install the water vent hose to the timing chain cover.
(7)
The firing and/or blow out test should not be performed within 30 minutes after the timing chain cover was assembled.
2.
Install the water pump.
(Refer to Cooling System - "Water Pump")
3.
Install the crankshaft damper pulley.
(Refer to Timing System - "Crankshaft Damper Pulley")
4.
Install the oil filter body.
(Refer to Lubrication System - "Oil Filter Body")
5.
Install the drive belt auto tensioner.
(Refer to Timing System - "Drive Belt Tensioner")
6.
Install the idler.
(Refer to Timing System - "Idler")
7.
Install the drive belt.
(Refer to Timing System - "Drive Belt")
8.
Install the LH/RH cylinder head cover.
(Refer to Cylinder Head Assembly - "Cylinder Head Cover")
9.
Install the intake manifold.
(Refer to Intake And Exhaust System - "Intake Manifold")
10.
Install the surge tank.
(Refer to Intake And Exhaust System - "Surge Tank")
11.
Install the air cleaner assembly.
(Refer to Intake And Exhaust System - "Air Cleaner")
12.
Refill the coolant.
(Refer to Cooling System - "Coolant")
13.
Install the lower oil pan.
(Refer to Lubrication System - "Oil Pan")
   
Refill engine oil.
Refill radiator and reservoir tank with engine coolant.
Bleed air from the cooling system.
-
Start engine and let it run until it warms up. (Until the radiator fan operates 3 or 4 times.)
-
Turn Off the engine and let it cool down. Check the level in the radiator, add coolant if needed. This will allow trapped air to be removed from the cooling system.
-
Put radiator cap on tightly, then run the engine again and check for leaks.
Clean the battery posts and cable terminals with sandpaper. Assemble and then apply grease to prevent corrosion.
Inspect for fuel leakage.
-
After assembling the fuel line, turn on the ignition switch (do not operate the starter) so that the fuel pump runs for approximately two seconds and that the fuel line is pressurized.
-
Repeat this operation two or three times, then check for fuel leakage at any point in the fuel lines.
Timing Chain Cover Components and Components Location
Components 1. Timing chain cover2. Gasket ...

Timing Chain Components and Components Location
Components 1. Oil pump sprocket2. Oil pump chain3. Oil pump tensioner assembly4. Crankshaft oil pump sprocket5. Crankshaft RH chain sprocket6. RH timing chain auto tensioner7. RH timing chain ten ...

Other information:

Hyundai Genesis (DH) 2013-2016 Service Manual: Canister Repair procedures


Removal 1. Turn the ignition switch OFF and disconnect the negative (-) battery cable. 2. Remove the rear-left wheel & tire and house cover. 3. Disconnect the canister close valve connector (A). 4. Disconnect the vent hose quick-connector (B). 5. Disconnect the vapor hose qu ...

Hyundai Genesis (DH) 2013-2016 Service Manual: 4&OD Clutch Control Solenoid Valve Repair procedures


Inspection 1. Turn ignition switch OFF. 2. Disconnect the E Module connector. 3. Measure resistance between solenoid valve terminals. 4. Check that the resistance is within the specification. ...

© 2013-2024 www.hgenesisdh.com