Hyundai Genesis (DH): Lighting System / Rear Combination Lamp Repair procedures
Hyundai Genesis (DH) 2013-2016 Service Manual / Body Electrical System / Lighting System / Rear Combination Lamp Repair procedures
| Removal |
| 1. |
Disconnect the negative (-) battery terminal. |
| 2. |
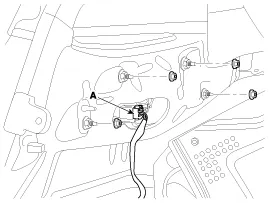
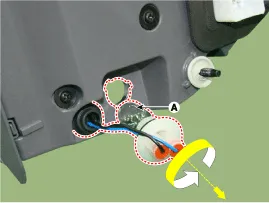
After loosening the nuts (4EA) holding the rear combination
lamp and disconnecting the connector (A), remove the outside rear
combination lamp assembly.
|
| 3. |
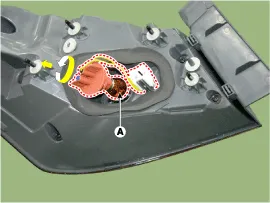
Remove the bulb (A) after turning it in the counter clock-wise direction.
|
| 4. |
Remove the trunk lid trim
(Refer to Body - "Trunk Lid Trim") |
| 5. |
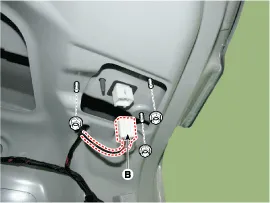
Remove the inside rear combination lamp assembly (A) after loosening the nuts (3EA) and disconnecting the connector.
|
| 6. |
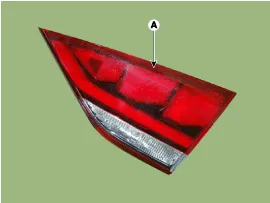
Remove the bulb (A) after separating the inside rear combination lamp assembly.
|
| 7. |
If it is necessary to replace the bulb, remove the bulb after removing the trunk lid trim. |
| Installation |
| 1. |
Install the inside combination lamp assembly after assembling the bulb. |
| 2. |
Install the rear combination lamp assembly after assembling the bulbs and connecting the lamp connector. |
Removal High Mounted Stop Lamp 1. Disconnect the negative (-) battery terminal. 2. Remove the roof trim assembly. (Refer to Body - "Roof Trim") 3.
Other information:
Hyundai Genesis (DH) 2013-2016 Service Manual: Parking Assist Sensor Repair procedures
Removal 1. Disconnect the negative (-) battery terminal. 2. Remove the front/rear bumper cover. (Refer to Body - "Front Bumper Cover") (Refer to Body - "Rear Bumper Cover") 3. Disconnect the connector (B) from the parking assist sensor (A).
Hyundai Genesis (DH) 2013-2016 Service Manual: Auto Defogging Sensor Description and Operation
Description The auto defogging sensor is installed on the front window glass. The sensor judges and sends signal if moisture occurs to blow out wind for defogging. The air conditioner control module receives signal from the sensor and restrains moisture and eliminate defog by controlling the intake actuator, A/C, auto defogging actuator,
Categories
- Manuals Home
- Hyundai Genesis Owners Manual
- Hyundai Genesis Service Manual
- Suspension System
- Parking Assist Sensor Repair procedures
- 4 Wheel Drive (AWD) System
- New on site
- Most important about car

Copyright © 2026 www.hgenesisdh.com - 0.0204