Hyundai Genesis (DH): Ignition System / Ignition Coil Repair procedures
Hyundai Genesis (DH) 2013-2016 Service Manual / Engine Electrical System / Ignition System / Ignition Coil Repair procedures
| Removal |
Ignition Coil #1
| 1. |
Turn the ignition switch OFF and disconnect the battery negative (-) cable. |
| 2. |
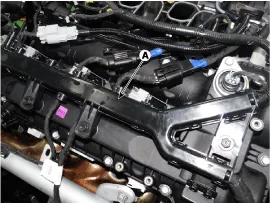
Remove the engine wiring protector (A) after loosening the bolt.
|
| 3. |
Disconnect the ignition coil connector (A). |
| 4. |
Remove the ignition coil from engine after removing mounting bolt (B).
|
Ignition Coil #2
| 1. |
Turn the ignition switch OFF and disconnect the battery negative (-) cable. |
| 2. |
Remove the surge tank assembly.
(Refer to Engine Mechanical System - "Surge Tank") |
| 3. |
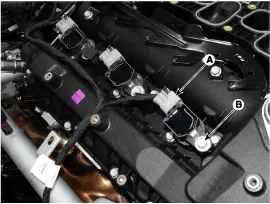
Disconnect the ignition connector (A). |
| 4. |
Remove the ignition coil from engine after removing mounting bolt (B).
|
Ignition Coil #3
| 1. |
Turn the ignition switch OFF and disconnect the battery negative (-) cable. |
| 2. |
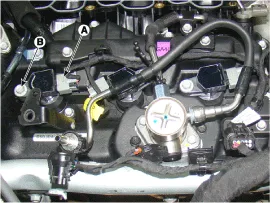
Remove the engine wiring protector (A) after loosening the bolt.
|
| 3. |
Disconnect the ignition coil connector (A). |
| 4. |
Remove the ignition coil from engine after removing mounting bolt (B).
|
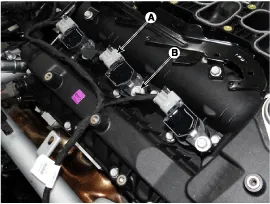
Ignition Coil #4
| 1. |
Turn the ignition switch OFF and disconnect the battery negative (-) cable. |
| 2. |
Remove the surge tank assembly.
(Refer to Engine Mechanical System - "Surge Tank") |
| 3. |
Disconnect the ignition coil connector (A). |
| 4. |
Remove the ignition coil from engine after removing mounting bolt (B).
|
Ignition Coil #5
| 1. |
Turn the ignition switch OFF and disconnect the battery negative (-) cable. |
| 2. |
Remove the engine wiring protector (A) after loosening the bolt.
|
| 3. |
Disconnect the ignition coil connector (A). |
| 4. |
Remove the ignition coil from engine after removing mounting bolt (B).
|
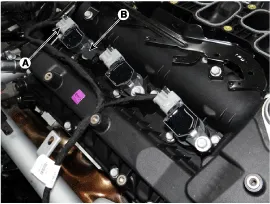
Ignition Coil #6
| 1. |
Turn the ignition switch OFF and disconnect the battery negative (-) cable. |
| 2. |
Remove the surge tank assembly.
(Refer to Engine Mechanical System - "Surge Tank") |
| 3. |
Disconnect the ignition coil connector (A). |
| 4. |
Remove the ignition coil from engine after removing mounting bolt (B).
|
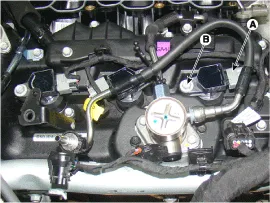
| Installation |
Do not confuse the ignition coil #2 with #4 connections.
Doing so may cause the engine to stall due to incomplete
ignition. And, since unburned fuel flows into the catalyst, this can
overheat and damage the catalyst.
A yellow tag (A) is attached to ignition coil #4. Use this tag for reference when connecting the ignition coils.
|

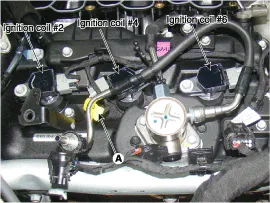
| 1. |
Install in the reverse order of removal.
|
| Inspection |
| 1. |
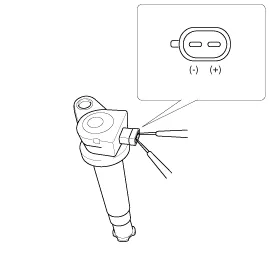
Measure the primary coil resistance between terminals (+) and (-).
Circuit Diagram Description A spark plug is a device for delivering electric current from an ignition system to the combustion chamber of a spark-ignition engine to ignite the compressed fuel/air mixture therein by means of an electric spark, while containing combustion pressure within the engine. Other information:Hyundai Genesis (DH) 2013-2016 Service Manual: Head Up Display Unit TroubleshootingT Hyundai Genesis (DH) 2013-2016 Service Manual: Condenser Repair proceduresInspection 1. Check the condenser fins for clogging and damage. If they are clogged, clean them with water, and blow them with compressed air. If they are bent, gently bend them using a screwdriver or pliers. 2. Check the condenser connections for leakage, and repair or replace it, if required. Categories

Copyright В© 2026 www.hgenesisdh.com - 0.0367
|