Hyundai Genesis (DH): Engine Control System / Fuel Tank Pressure Sensor (FTPS) Repair procedures
| Inspection |
| 1. |
Connect the GDS on the Data Link Connector (DLC ). |
| 2. |
Measure the output voltage of the FTPS.
|
| Removal |
| 1. |
Turn the ignition switch OFF and disconnect the negative (-) battery cable. |
| 2. |
Fold the rear seat cushion. |
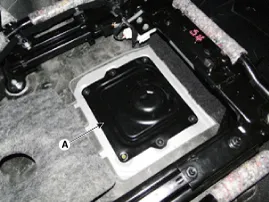
| 3. |
Remove the sub fuel sender service cover (A) after removing installation screw.
|
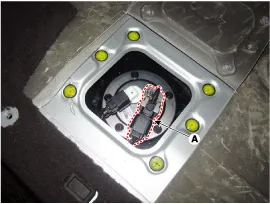
| 4. |
Disconnect the fuel tank pressure sensor connector (A). |
| 5. |
Remove the fuel tank pressure sensor from the sub fuel sender after loosening nut.
|
| Installation |
Circuit Diagram Description Based on information from various sensors, the ECM can calculate the fuel amount to be injected. The fuel injector is a solenoid-operated valve and the fuel injection amount is controlled by length of injection time. Other information:Hyundai Genesis (DH) 2013-2016 Service Manual: Auto Defogging Sensor Description and OperationDescription The auto defogging sensor is installed on the front window glass. The sensor judges and sends signal if moisture occurs to blow out wind for defogging. The air conditioner control module receives signal from the sensor and restrains moisture and eliminate defog by controlling the intake actuator, A/C, auto defogging actuator, Hyundai Genesis (DH) 2013-2016 Service Manual: Temperature Control Actuator Repair proceduresInspection 1. Turn the ignition switch OFF. 2. Disconnect the temperature control actuator connector. 3. Verify that the temperature control actuator operates to the warm (Driver's side) or cool (Passenger's side) position when connecting 12V to terminal 3 and grounding terminal 4. Categories

Copyright © 2026 www.hgenesisdh.com - 0.0291
|
