
Hyundai Genesis (DH): Blower / Blower Motor Repair procedures
Hyundai Genesis (DH) 2013-2016 Service Manual / Heating, Ventilation and Air Conditioning / Blower / Blower Motor Repair procedures
| Inspection |
| 1. |
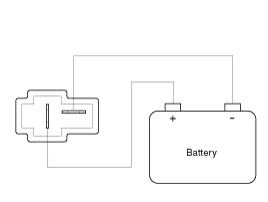
Connect the battery voltage and check the blower motor rotation.
|
| 2. |
If the blower motor does not operate well, replace it with a genuine blower motor check for proper operation. |
| 3. |
Replace the blower motor if it is proved that there is a problem with it.
|
| Replacement |
| 1. |
Disconnect the negative (-) battery terminal. |
| 2. |
Remove the cowl side trim.
(Refer to Body - "Cowl Side Trim") |
| 3. |
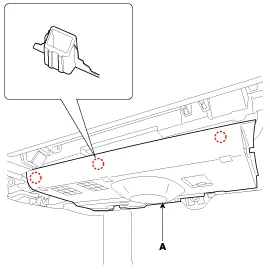
To remove the crash pad under cover [RH] (A), press both sides of the pushpin and then pull it down.
|
| 4. |
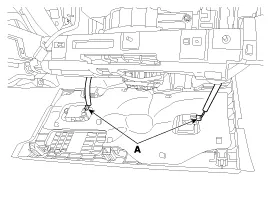
Disconnect the under lamp connector (A).
|
| 5. |
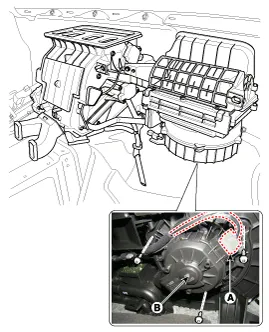
Disconnect the blower motor connector (A) and then remove the blower motor (B) after loosening the screws.
|
| 6. |
Install in the reverse order of removal. |
Replacement 1. Disconnect the negative (-) battery terminal. 2. Recover the refrigerant with a recovery/recycling/charging station. 3. When the engine cools down, drain the engine coolant from the radiator.
Inspection 1. Turn the ignition switch ON. 2. Manually operate the control switch and control the voltage of the blower motor. 3. Select the control switch to raise the voltage until high speed.
Other information:
Hyundai Genesis (DH) 2013-2016 Service Manual: Components and Components Location
C
Hyundai Genesis (DH) 2013-2016 Service Manual: CO2 Sensor Description and Operation
Description This system maintains the density of carbon dioxide constantly in vehicle interior by measuring the amount of carbon dioxide to increase the comfortableness and the fuel consumption rate when air conditioning system is operating.
Categories
- Manuals Home
- Hyundai Genesis Owners Manual
- Hyundai Genesis Service Manual
- Description and Operation
- Components and Components Location
- General Information
- New on site
- Most important about car

Copyright В© 2026 www.hgenesisdh.com - 0.0208