Hyundai Genesis (DH): AVN System / Front LCD monitor Repair procedures
| Removal |
Take care not to scratch the crash pad and related parts. |

| 1. |
Disconnect the negative (-) battery terminal. |
| 2. |
Remove the crash pad side garnish assembly.
(Refer to Body - "Crash pad side garnish assembly")
|
| 3. |
Remove the fascia panel monitor.
(Refer to Body - "Crash Pad Main Lower Assembly") |
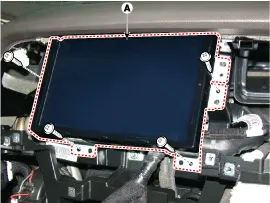
| 4. |
Remove the front LCD monitor after loosening the mounting screws.
|
| Installation |
| 1. |
Install the front LCD monitor after connecting the connector. |
| 2. |
Install the monitor fascia panel.
|
Components NO.Connector ANO.Connector BNO.Connector C1B (+)1-1Right side low (+)2B (+)2-2Left side low (+)3B (+)3-3Right front midrange/tweeter (+)4-4-4Left front midrange/tweeter (+)5Multimedia-CAN (high)5-5Right front door (+)6Multimedia-CAN (low)6-6Left front door (+)7ACC7-7Right side low (-)8-8-8Left side low (-)9-9-9Right front midrange/tweeter (-)10-10-10Left front midrange/tweeter (-)11NAVI sound (+)11-11Right front door (-)12Sub woofer 2 (+)12-12Left front door (-)13Sub woofer 1 (+)13-1314GND14-1415GND15-1516GND16-1617-171718SPDIF (+)181819SPDIF (-)191920SPDIF GND(shield)202021-212122-222223-2324NAVI sound (-)2425Sub woofer 2 (-)2526Sub woofer 1 (-)26
Other information:
Hyundai Genesis (DH) 2013-2016 Service Manual: Compressor oil Repair procedures
Oil Specification 1. The HFC-134a system requires synthetic (PAG) compressor oil whereas the R-12 system requires mineral compressor oil. The two oils must never be mixed. 2. Compressor (PAG) oil varies according to compressor model. Be sure to use oil specified for the compressor model.
Hyundai Genesis (DH) 2013-2016 Service Manual: Auto Defogging Sensor Description and Operation
Description The auto defogging sensor is installed on the front window glass. The sensor judges and sends signal if moisture occurs to blow out wind for defogging. The air conditioner control module receives signal from the sensor and restrains moisture and eliminate defog by controlling the intake actuator, A/C, auto defogging actuator,
Categories
- Manuals Home
- Hyundai Genesis Owners Manual
- Hyundai Genesis Service Manual
- Restraint
- Front Door
- Electric Parking Brake (EPB) Repair procedures
- New on site
- Most important about car
