Hyundai Genesis (DH): General Information / Description and Operation
| Warning Lamp Activation |
| Warning Lamp Behavior after Ignition On |
| 1. |
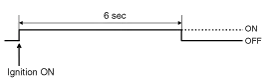
Active fault or historical fault counter is greater or equal to 10.
|

| 2. |
Normal or historical fault counter is less than 10.
|
| 3. |
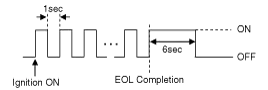
When turning the ignition switch ON during variant coding
(EOL) mode, the airbag warning lamp is turned on and blinks at intervals
of 1 second till the coding is completed.
In case the variant coding is normally completed, the airbag
warning lamp is turned on for 6 seconds, and then turned off. Otherwise
the airbag warning lamp continuously blinks at intervals of 1 second.
When there is active fault in the airbag system or SRSCM
internal fault, the variant coding (EOL) cannot be completed. In this
case, do the variant coding (EOL) procedure again after troubleshooting
with the GDS. |

| 1. |
Loss of battery supply to the SRSCM : warning lamp is turned on continuously. |
| 2. |
Loss of internal operating voltage : warning lamp is turned on continuously. |
| 3. |
Loss of microprocessor operation : warning lamp is turned on continuously. |
| 4. |
SRSCM not connected : warning lamp is turned on continuously. |
| Occupant Status | Telltale Lamp | PAB |
| Empty | ON | Disabled |
| Child (Small Occupant) | ON | Disabled |
| Adult (Large Occupant) | OFF | Enabled |
| Defect | OFF | Enabled |
Precautions General Precautions Please read the following precautions carefully before performing the airbag system service. Observe the instructions described in this manual, or the airbags could accidentally deploy and cause damage or injuries.
Component Replacement after Deployment Before doing any SRS repairs, use the GDS to check for DTCs. Refer to the Diagnostic Trouble Code list for repairing of the related DTCs.
Other information:
Hyundai Genesis (DH) 2013-2016 Service Manual: Description and Operation
Description System Overview The System offers the following features: - Changing the state of engine ignition and power by using the start button. - Controlling external relays for ACC / IGN1 / IGN2 terminal switching and STARTER, without use of mechanical ignition switch.
Hyundai Genesis (DH) 2013-2016 Service Manual: Blind Spot Detection Switch Repair procedures
Removal 1. Disconnect the negative (-) battery terminal. 2. Remove the crash pad lower panel. (Refer to Body - "Crash Pad") 3. Remove the blind spot detection (BSD) switch (A) after disengaging the mounting clip. Installation 1. Install the crash pad side switch assembly after connecting the connector.
Categories
- Manuals Home
- Hyundai Genesis Owners Manual
- Hyundai Genesis Service Manual
- Parking Assist Sensor Repair procedures
- Emission Control System
- Starter Repair procedures
- New on site
- Most important about car
