Hyundai Genesis (DH): Electro Chromic Inside Rear View Mirror / Description and Operation
Hyundai Genesis (DH) 2013-2016 Service Manual / Body Electrical System / Electro Chromic Inside Rear View Mirror / Description and Operation
| Description |
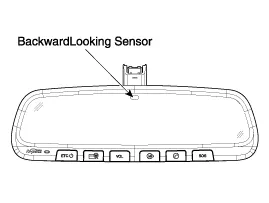
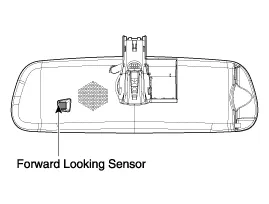
The ECM (Electro Chromatic inside rear view Mirror)
automatically dims when it senses light reflecting in the rear view
mirror. The forward facing sensor detects brightness of the
surroundings, while the rearward looking sensor is for the light from
the rear. The strength of the light in the rear sensor is used by the
mirror to adjust the shading. It ranges from 7 to 85%. When the reverse
gear is engaged, it stops functioning.
| 1. |
The forward facing sensor sees if the brightness of the surroundings is low enough for the mirror to operate its function. |
| 2. |
The rearward looking sensor detects glaring of the reflecting light from a vehicle behind. |
| 3. |
The ECM is darkened to the level as determined by the
rearward looking sensor. When the glaring is no longer detected, the
mirror stops functioning.
|
| Description |
The compass feature is designed to be integrated into an electro chromic interior rearview mirror.
The mirror assembly shall display a compass heading.
The compass mirror then take the sensor information to
determine static field strengths and rotating field information to
determine an accurate compass heading.
Specification
| Item | Standard value |
| Rate voltage | DC 12V |
| Operating voltage range | DC9 ~ 16V |
| Operating temperature range | -30 ~ +65 |
Components
Inspection Check it by the procedure below to see if the function of the ECM is normal. 1. Turn the ignition key to the "ON" position. 2. Cover the forward facing sensor.
Other information:
Hyundai Genesis (DH) 2013-2016 Service Manual: Description and Operation
Description Integrated Rain Sensor Integrated rain sensor (A) controls three systems: front wiper, auto-light, and central air conditioner. 1. Wiper Control System When "AUTO" switch signal is received from the multi-function switch on the right, the integrated rain sensor detects the amount of rainfall.
Hyundai Genesis (DH) 2013-2016 Service Manual: CO2 Sensor Description and Operation
Description This system maintains the density of carbon dioxide constantly in vehicle interior by measuring the amount of carbon dioxide to increase the comfortableness and the fuel consumption rate when air conditioning system is operating.
Categories
- Manuals Home
- Hyundai Genesis Owners Manual
- Hyundai Genesis Service Manual
- Body (Interior and Exterior)
- Restraint
- Suspension System
- New on site
- Most important about car

Copyright © 2026 www.hgenesisdh.com - 0.0371