Hyundai Genesis (DH): Cylinder Head Assembly / Cylinder Head Cover Repair procedures
Hyundai Genesis (DH) 2013-2016 Service Manual / Engine Mechanical System / Cylinder Head Assembly / Cylinder Head Cover Repair procedures
| Removal |
LH Cylinder Head Cover
| 1. |
Disconnect the battery "-" terminal from the trunk room. |
| 2. |
Remove the surge tank.
(Refer to Intake And Exhaust System - "Surge Tank") |
| 3. |
Remove the intake manifold.
(Refer to Intake And Exhaust System - "Intake Manifold") |
| 4. |
Remove the high-pressure fuel pipe.
(Refer to Fuel system - "delivery pipe") |
| 5. |
Remove the LH ignition coil and wiring.
(Refer to Engine Electrical System - "Ignition Coil") |
| 6. |
Remove the high pressure fuel pump.
(Refer to Engine Control / Fuel System - "High Pressure Fuel Pump") |
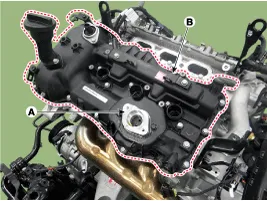
| 7. |
Remove the LH cylinder head cover.
|

RH Cylinder Head Cover
| 1. |
Disconnect the battery "-" terminal from the trunk room. |
| 2. |
Remove the surge tank.
(Refer to Intake And Exhaust System - "Surge Tank") |
| 3. |
Remove the RH ignition coil and wiring.
(Refer to Engine Electrical System - "Ignition Coil") |
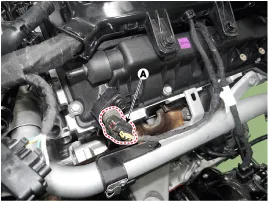
| 4. |
Remove the RH exhaust CMP sensor connector (A).
|
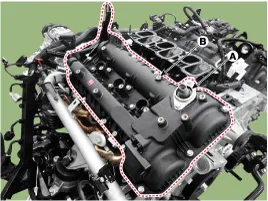
| 5. |
Remove the RH cylinder head cover.
|
| Installation |
LH Cylinder Head Cover
| 1. |
Install the LH cylinder head cover.
|
