Hyundai Genesis (DH): Auto Head Lamp Leveling Device / Auto Head Lamp Leveling Unit Repair procedures
| Inspection |
| 1. |
Ignition "ON". |
| 2. |
Turn on the head lamp switch. |
| 3. |
Check that the aim of the head lamp changes smoothly when the head lamp leveling device switch is turned on. |
| 4. |
If it does not operate well, check the connector and terminals to make sure that they are connected.
If the terminals are bent, loose or corroded, repair them as necessary, and recheck the system.
If the terminal is in good condition, move to the step 5. |
| 5. |
Replace the head lamp assembly and check for proper operation. |
| Removal |
| 1. |
Disconnect the negative (-) battery terminal. |
| 2. |
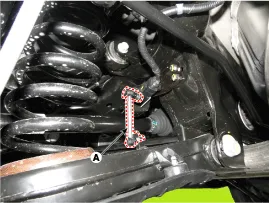
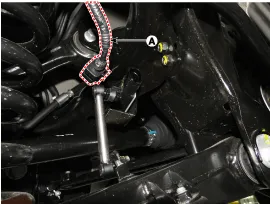
Remove the head lamp leveling unit linkage (A) installed on the rear left axle.
|
| 3. |
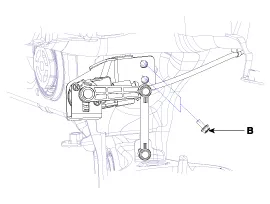
Remove the head lamp leveling unit assembly after disconnecting the unit connector (A) and loosening the mounting bolts (B).
|
| Installation |
| 1. |
Install the head lamp leveling unit. |
| 2. |
Reconnect the head lamp leveling unit connector. |
Description According to driving environment and loading state of vehicle, head lamp lighting direction is changed to keep the driver's visibility range and to protect the driver's vision from glare, aiming at safety driving.
Inspection with GDS Initialization and diagnosis sequence by using GDS equipment. The following is the summarized A/S procedure. NoProcedure1Park the vehicle on level ground2Tire check3IGN1 ON4Head lamp Low Beam ON5Connection with diagnostic tool6Initial command by diagnostic tool7Clear DTC Code8IGN1 OFF > ON9Re- Connection with diagnostic tool10Checking of HLLD output value as 15% and DTC Code11HLLD actuating by diagnostic tool command12Head lamp mechanical Initial Aiming 1.
Other information:
Hyundai Genesis (DH) 2013-2016 Service Manual: Auto Light Sensor Repair procedures
Removal 1. Disconnect the negative (-) battery terminal. 2. Remove the photo & auto light sensor. (Refer to Windshield Wiper/Washer - "Rain Sensor") Installation 1. Install the auto light sensor. 2. Connect the negative (-) battery terminal.
Hyundai Genesis (DH) 2013-2016 Service Manual: CO2 Sensor Repair procedures
R
Categories
- Manuals Home
- Hyundai Genesis Owners Manual
- Hyundai Genesis Service Manual
- Suspension System
- Body Electrical System
- Smart Cruise Control Unit Repair procedures
- New on site
- Most important about car


