Hyundai Genesis (DH): Intake And Exhaust System / Air Cleaner Repair procedures
Hyundai Genesis (DH) 2013-2016 Service Manual / Engine Mechanical System / Intake And Exhaust System / Air Cleaner Repair procedures
| Removal and Installation |
[Air Cleaner Assembly]
| 1. |
Disconnect the battery "-" terminal from the trunk room. |
| 2. |
Remove the engine cover.
(Refer to Engine And Transaxle Assembly - "Engine Cover") |
| 3. |
Remove the engine room cover.
(Refer to Engine And Transaxle Assembly - "Engine Cover") |
| 4. |
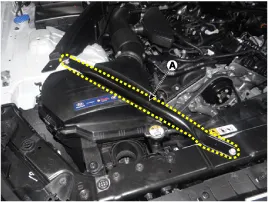
Remove the front strutbar (A).
|
| 5. |
Remove the air intake hose and air cleaner assembly.
|

| 6. |
To install, reverse the removal procedure. |
[Air Cleaner Element]
| 1. |
Disconnect the battery "-" terminal from the trunk room. |
| 2. |
Remove the engine cover. |
| 3. |
Remove the engine room cover.
(Refer to Engine And Transaxle Assembly - "Engine Cover") |
| 4. |
Remove the front strutbar (A).
|
| 5. |
Remove the retaining clips air cleaner cover, and then the air cleaner element (A).
|

| 6. |
To install, reverse the removal procedure. |
Components 1. Air cleaner cover2. Air cleaner element3. Air cleaner body4. Air intake hose5. Resonator6. Intake air temperature sensor (IATS)
Removal and Installation 1. Disconnect the battery "-" terminal from the trunk room. 2. Remove the engine cover. (Refer to Engine And Transaxle Assembly - "Engine Cover") 3.
Other information:
Hyundai Genesis (DH) 2013-2016 Service Manual: Components and Components Location
C
Hyundai Genesis (DH) 2013-2016 Service Manual: Head Up Display Unit Repair procedures
Removal 1. Disconnect the negative (-) battery terminal. 2. Remove the head up display bezel (A). 3. Remove the instrument cluster. (Refer to Indicators And Guages - "Instrument Cluster") 4. Remove the head up display unit bracket (A) after loosening the mounting nuts.
Categories
- Manuals Home
- Hyundai Genesis Owners Manual
- Hyundai Genesis Service Manual
- 4 Wheel Drive (AWD) System
- Restraint
- Smart Cruise Control Unit Repair procedures
- New on site
- Most important about car

Copyright © 2026 www.hgenesisdh.com - 0.0222