Hyundai Genesis (DH): Charging System / Battery Sensor Description and Operation
Hyundai Genesis (DH) 2013-2016 Service Manual / Engine Electrical System / Charging System / Battery Sensor Description and Operation
| Description |
Vehicles have many control units that need large amounts of
electricity. These units control their own system based on information
from diverse sensors. It is important to maintain a stable power supply
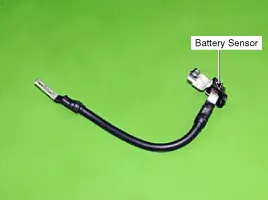
as these sensors give a variety of information. Battery sensor is
mounted on battery (-) terminal. It transmits battery voltage, current,
temperature information to ECM. ECM controls generating voltage by duty
cycle based on these signals.
When battery sensor signal fault occurs, check whether the
parasitic draw is not abnormal (Refer to vehicle parasitic current
inspection) |

It takes a few hours for a new battery sensor to detect the battery state correctly.
Perform the following process after replacing the battery sensor.
|

For the vehicle equipped with a battery sensor, be careful
not to damage the battery sensor when the battery is replaced or
recharged.
Troubleshooting Removal 1. Disconnect the battery negative (-) cable. 2. Disconnect the battery sensor connector (A). 3. Remove the battery negative (-) cable after removing the bolts (B). Other information:Hyundai Genesis (DH) 2013-2016 Service Manual: Rheostat Repair proceduresInspection 1. Disconnect the negative (-) battery terminal. 2. Remove the crash pad lower panel. (Refer to Body - "Crash Pad Lower Panel") 3. Remove the lower crash pad switch assembly (A) after disengaging the mounting clip. 4. Remove the rheostat switch connector (A). Hyundai Genesis (DH) 2013-2016 Service Manual: Description and OperationD Categories

Copyright © 2026 www.hgenesisdh.com - 0.0205
|