Hyundai Genesis (DH): Charging System / Battery Sensor Repair procedures
Hyundai Genesis (DH) 2013-2016 Service Manual / Engine Electrical System / Charging System / Battery Sensor Repair procedures
| Removal |
| 1. |
Disconnect the battery negative (-) cable. |
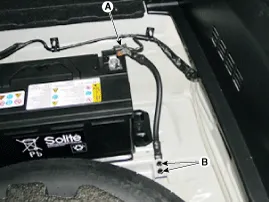
| 2. |
Disconnect the battery sensor connector (A). |
| 3. |
Remove the battery negative (-) cable after removing the bolts (B).
|
| Installation |
| 1. |
Install in the reverse order of removal.
|
Description Vehicles have many control units that need large amounts of electricity. These units control their own system based on information from diverse sensors.
Categories
- Manuals Home
- Hyundai Genesis Owners Manual
- Hyundai Genesis Service Manual
- Active Air Flap(AAF) Repair procedures
- Electric Parking Brake (EPB) Repair procedures
- Repair procedures
- New on site
- Most important about car

Copyright © 2026 www.hgenesisdh.com - 0.0266