Hyundai Genesis (DH): Blower / Power Mosfet Repair procedures
Hyundai Genesis (DH) 2013-2016 Service Manual / Heating, Ventilation and Air Conditioning / Blower / Power Mosfet Repair procedures
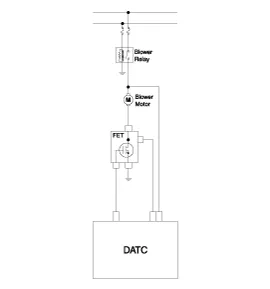
| Inspection |
| 1. |
Turn the ignition switch ON. |
| 2. |
Manually operate the control switch and control the voltage of the blower motor. |
| 3. |
Select the control switch to raise the voltage until high speed.
Specification
Inspection 1. Connect the battery voltage and check the blower motor rotation. 2. If the blower motor does not operate well, replace it with a genuine blower motor check for proper operation. Description The climate control air filter is located in the blower unit. It eliminates foreign materials and odor. The particle filter performs a role as an odor filter as well as a conventional dust filter to ensure comfortable interior environment. Other information:Hyundai Genesis (DH) 2013-2016 Service Manual: Components and Components LocationC Hyundai Genesis (DH) 2013-2016 Service Manual: Blower Unit Components and Components LocationComponent Location Components 1. Seal2. Intake Duct Case3. Intake Door4. Intake Actuator5. Intake Duct Case (A)6. Climate Control Air Filter7. Climate Control Air Filter Cover8. Cluster Ionizer9. Blower Upper Case10. Blower Lower Case11. Power Mosfet12. Categories

Copyright © 2026 www.hgenesisdh.com - 0.0202
|