Hyundai Genesis: Lubrication System / Oil Pan Repair procedures

Removal
[Lower oil pan]
1.
Disconnect the battery "-" terminal from the trunk room.
2.
Remove the engine under cover.
(Refer to Engine And Transaxle Assembly - "Engine Room Under Cover")
3.
Drain the engine oil.
(Refer to Lubrication System - "Engine Oil")
4.
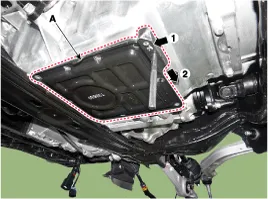
Remove the lower oil pan (A).
[2WD]

[AWD]

   
Insert the blade of SST (09215-3C000) between the upper oil pan and lower oil pan.
Cut off applied sealer and remove the lower oil pan.
Insert the SST between the oil pan and the ladder frame by tapping it with a plastic hammer in the direction of arrow.
After tapping the SST with a plastic hammer along the direction of arrow around more than 2/3 edge of the oil pan, remove it from the ladder frame.
Do not use the SST as a prybar.
Hold the tool in position (on the gasket line) and tap in with a light hammer.
Be careful not to damage the contact surfaces of Upper oil pan and lower oil pan.
[2WD Upper oil pan]
1.
Remove the sub frame from the vehicle.
2.
Remove the timing chain cover.
(Refer to Timing System - "Timing Chain Cover")
3.
Remove the lower oil pan.
(Refer to Lubrication System - "Oil Pan")
4.
Remove the air conditioning compressor.
(Refer to Heating, Ventilation, Air Conditioning - "Compressor")
5.
Remove the upper oil pan (A).

   
Insert the blade of SST (09215-3C000) between the upper oil pan and lower oil pan.
Cut off applied sealer and remove the lower oil pan.
[AWD Upper oil pan]
1.
Remove the sub frame from the vehicle.
2.
Remove the Driveshaft and axle.
(Refer to Driveshaft and Axle - "Front Driveshaft")
3.
Remove the front differential carrier.
(Refer to Driveshaft and Axle - "Front Differential Carrier")
4.
Remove the Timing chain cover.
( Refer to Timing System - "Timing Chain Cover")
5.
Remove the lower oil pan.
(Refer to Lubrication System - "Oil Pan")
6.
Remove the air conditioning compressor.
(Refer to Heating, Ventilation, Air Conditioning - "Compressor")
7.
Remove the adjustable oil pump connector, and after retaining clips (A), push the connector (B) inward.

8.
Remove the upper oil pan (A).

   
Insert the blade of SST (09215-3C000) between the upper oil pan and lower oil pan.
Cut off applied sealer and remove the lower oil pan.
9.
Remove the oil pump.
(Refer to Lubrication System - "Oil Pump")
10.
Remove the oil pump (A), together with the upper oil pan (B).

Installation
[Lower oil pan]
1.
Install the lower oil pan (A).
A.
Using a gasket scraper, remove all the old packing material from the gasket surfaces.
B.
Before assembling the oil pan, the liquid sealant THREE BOND 1217H should be applied on oil pan. The assembly must be done within 5 minutes after the sealant is applied.

Bead width : 2.5 mm (0.1 in.)

[2WD]

[AWD]

   
Clean the sealing face before assembling two parts.
Remove harmful foreign matters on the sealing face before applying sealant.
When applying sealant gasket, sealant must not protrude into the inside of oil pan.
To prevent leakage of oil, apply sealant gasket to the inner threads of the bolt holes.
After assembly, wait at least 30 minutes before filling the engine with oil.
C.
Install the oil pan (A).
Tighten the bolts in two or three steps.
[2WD]

[AWD]

2.
After assembly, wait at least 30 minutes before filling the engine with oil.
(Refer to Lubrication System - "Engine Oil")
3.
Install all other parts in the reverse order of removal.
[2WD Upper oil pan]
1.
Install the lower oil pan (A).
A.
Using a gasket scraper, remove all the old packing materials from the gasket surfaces.
B.
Before assembling the oil pan, the liquid sealant THREE BOND 1217H should be applied on oil pan. The assembly must be done within 5 minutes after the sealant is applied.

Bead width : 2.5 mm (0.1 in.)

   
Clean the sealing face before assembling two parts.
Remove harmful foreign matters on the sealing face before applying sealant.
When applying sealant gasket, sealant must not protrude into the inside of oil pan.
To prevent leakage of oil, apply sealant gasket to the inner threads of the bolt holes.
After assembly, wait at least 30 minutes before filling the engine with oil.
C.
Install the upper oil pan.
Tighten the bolts in two or three steps.

Tightening torque
Short bolt :
20.6 ~ 22.6 N.m (2.1 ~ 2.3 kgf.m, 15.2 ~ 16.6 lb-ft)
Long bolt :
9.8 ~ 11.8 N.m (1.0 ~ 1.2 kgf.m, 7.2 ~ 8.7 lb-ft)

2.
Install all other parts in the reverse order of removal.
[AWD Upper oil pan]
1.
Install the oil pump (A) and upper oil pan (B).

A.
Using a gasket scraper, remove all the old packing material from the gasket surfaces.
B.
Before assembling the oil pan, the liquid sealant THREE BOND 1217H should be applied on oil pan. The assembly must be done within 5 minutes after the sealant is applied.

Bead width : 2.5 mm (0.1 in.)

   
Clean the sealing face before assembling two parts.
Remove harmful foreign matters on the sealing face before applying sealant.
When applying sealant gasket, sealant must not protrude into the inside of oil pan.
To prevent leakage of oil, apply sealant gasket to the inner threads of the bolt holes.
After assembly, wait at least 30 minutes before filling the engine with oil.
C.
Tighten the bolts in two or three steps.

Tightening torque
Short bolt :
20.6 ~ 22.6 N.m (2.1 ~ 2.3 kgf.m, 15.2 ~ 16.6 lb-ft)
Long bolt :
9.8 ~ 11.8 N.m (1.0 ~ 1.2 kgf.m, 7.2 ~ 8.7 lb-ft)

2.
Install all other parts in the reverse order of removal.
Oil Pan Components and Components Location
Components 1. 2WD Lower oil pan2. AWD Lower oil pan3. 2WD Upper oil pan4. AWD Upper oil pan5. Cylinder block ...

Oil Pump Description and Operation
Description 2-Stage variable Vane Pump improves the fuel economy by controlling the oil pressure into two stages and by optimizing the hydraulics of low/medium rpm. The oil pressure/temperatur ...

Other information:

Hyundai Genesis (DH) 2013-2016 Owners Manual: System operation


Ventilation 1. Set the mode to the position. 2. Set the air intake control to the outside (fresh) air position. 3. Set the temperature control to the desired position. 4. Set the fan speed control to the desired speed. Heating 1. Set the mode to the position. 2. Set the air intake con ...

Hyundai Genesis (DH) 2013-2016 Owners Manual: Parking Guide System


The Parking Guide System (PGS) will activate when the back-up light is ON with the Engine Start/Stop button ON and the shift lever in the R (Reverse) position. The Parking Guide System is not a substitute for proper and safe parking procedures. The Parking Guide System may not det ...

© 2013-2024 www.hgenesisdh.com