Hyundai Genesis (DH): Automatic Transmission Control System / Shift Cable Repair procedures
Hyundai Genesis (DH) 2013-2016 Service Manual / Automatic Transmission System (SBC) / Automatic Transmission Control System / Shift Cable Repair procedures
| Removal |
| 1. |
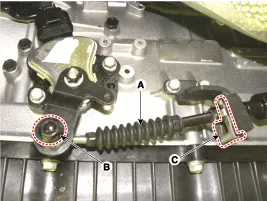
Remove the nut (B) and clip (C). |
| 2. |
Remove the shift cable (A) assembly from the transmission.
|
| 3. |
Remove the floor console.
(Refer to Body-"Floor Console") |
| 4. |
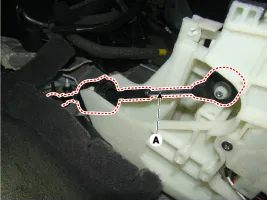
Disconnect the shift cable (A) from the shift lever.
|
| 5. |
Remove the shift cable assembly (B) by removing the nuts (A).
|

| 6. |
Pull the rubber plug from the floor and pull out the shift cable assembly.
|
| Installation |
| 1. |
To install, reverse the removal procedure. |
| Adjustment |
| How to Adjust Shift Cable |
| 1. |
Insert the shift cable to the bracket and hold it with a new clip. |
| 2. |
Align the manual lever hole to the hole on the transmission case and hold the position with a bar. |
| 3. |
Eliminate shift cable free play of the shift cable. |
| 4. |
Firmly hold the special bolt with a wrench and tighten the nut(A) to the specified torque.
|

| 5. |
Take off the bar holding the manual lever. |
| 6. |
Shifting each position, check if the shift lever moves smoothly. |
Components 1. Shift lever knob2. Shift lever boots3. Shift lever assembly4. Shift cable
Other information:
Hyundai Genesis (DH) 2013-2016 Service Manual: Components and Components Location
C
Hyundai Genesis (DH) 2013-2016 Service Manual: Blind Spot Detection Unit Repair procedures
Removal 1. Disconnect the negative (-) battery terminal. 2. Remove the rear bumper. (Refer to Body - "Rear Bumper") 3. Remove the BSD unit (A) after loosening the mounting nuts. Take care not to separate the bracket from rear bumper when removing the BSD sensor.
Categories
- Manuals Home
- Hyundai Genesis Owners Manual
- Hyundai Genesis Service Manual
- Suspension System
- Smart Cruise Control Unit Repair procedures
- Steering System
- New on site
- Most important about car

Copyright © 2026 www.hgenesisdh.com - 0.0241