Hyundai Genesis (DH): Airbag Module / Passenger Airbag (PAB) Module Repair procedures
Hyundai Genesis (DH) 2013-2016 Service Manual / Restraint / Airbag Module / Passenger Airbag (PAB) Module Repair procedures
| Removal |
| 1. |
Disconnect the battery negative cable and wait for at least three minutes before beginning work. |
| 2. |
Remove the crash pad.
(Refer to Body - "Crash Pad" ) |
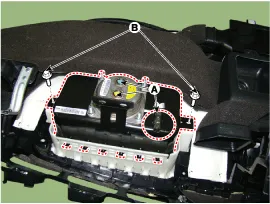
| 3. |
Disconnect the passenger airbag connector (A) and remove the mounting bolts (B).
|

| Installation |
| 1. |
Disconnect the battery negative cable from battery and wait for at least three minutes before beginning work. |
| 2. |
Place a passenger airbag on the crash pad and tighten the passenger airbag mounting bolts(2) (A).
|
| 3. |
Install the crash pad.
(Refer to Body - "Main Crash Pad Assembly") |
| 4. |
Tighten the passenger airbag mounting bolts (B) and Attach the connector to the airbag module (A).
|
| 5. |
install theGlove box housing
(Reper Body - "Glove Box" ) |
| 6. |
Reconnect the battery cable(-) |
| 7. |
After installing the passenger airbag, confirm proper system operation:
Turn the ignition switch ON; the SRS indicator light should turn on for about six seconds and then go off. |
Description The Side Airbags (SAB) are installed inside the front seat and protects the driver and passenger from danger when a side crash occurs.
Other information:
Hyundai Genesis (DH) 2013-2016 Service Manual: Blind Spot Detection Switch Repair procedures
Removal 1. Disconnect the negative (-) battery terminal. 2. Remove the crash pad lower panel. (Refer to Body - "Crash Pad") 3. Remove the blind spot detection (BSD) switch (A) after disengaging the mounting clip. Installation 1. Install the crash pad side switch assembly after connecting the connector.
Hyundai Genesis (DH) 2013-2016 Service Manual: Troubleshooting
Troubleshooting Problem Symptoms Table Before replacing or repairing air conditioning components, first determine if the malfunction is due to the refrigerant charge, air flow or compressor. Use the table below to help you find the cause of the problem.
Categories
- Manuals Home
- Hyundai Genesis Owners Manual
- Hyundai Genesis Service Manual
- Emission Control System
- Repair procedures
- General Information
- New on site
- Most important about car

Copyright © 2026 www.hgenesisdh.com - 0.0315