Hyundai Genesis (DH): Lighting System / Overhead Console Lamp Repair procedures
| Inspection |
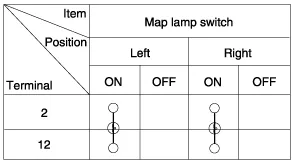
| 1. |
Remove the overhead console lamp assembly and check for
continuity between terminals. If the continuity is not as specified,
replace the map lamp switch.
|

| Removal |
| 1. |
Disconnect the negative (-) battery terminal. |
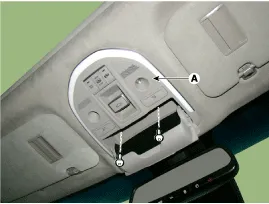
| 2. |
Remove the mounting screws (2EA).
And then remove the overhead console (A).
|
| 3. |
Remove the overhead console after disconnecting the connector (A).
|

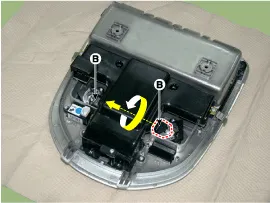
| 4. |
Remove the overhead console lamp (B) by turning the socket.
|
| Installation |
| 1. |
Install the overhead console lamp after connecting the connector. |
| 2. |
Install the lens after tightening 2 screws. |
Removal 1. Disconnect the negative (-) battery terminal. 2. Separate the room lamp (B) from the roof trim after disengaging the mounting clip (A).
Removal 1. Disconnect the negative (-) battery terminal. 2. Remove the front door trim. (Refer to Body - "Front Door Trim") 3. Disconnect the door mood lamp connectors (A).
Other information:
Hyundai Genesis (DH) 2013-2016 Service Manual: Description and Operation
System Overview RPAS (Rear Parking Assist System) is an electronic driving aid that warns the driver to be cautious while parking or driving at low speed. The sensor uses ultrasonic waves to detect objects within proximity of the vehicle. RPAS consists of four RPS sensors which are detecting the obstacles and transmit the result separat
Hyundai Genesis (DH) 2013-2016 Service Manual: Temperature Control Actuator Repair procedures
Inspection 1. Turn the ignition switch OFF. 2. Disconnect the temperature control actuator connector. 3. Verify that the temperature control actuator operates to the warm (Driver's side) or cool (Passenger's side) position when connecting 12V to terminal 3 and grounding terminal 4.
Categories
- Manuals Home
- Hyundai Genesis Owners Manual
- Hyundai Genesis Service Manual
- Restraint
- Brake System
- Engine Electrical System
- New on site
- Most important about car
