Hyundai Genesis (DH): Timing System / Drive Belt Repair procedures
Hyundai Genesis (DH) 2013-2016 Service Manual / Engine Mechanical System / Timing System / Drive Belt Repair procedures
| Removal and Installation |
| 1. |
Disconnect the battery "-" terminal from the trunk room. |
| 2. |
Remove the engine cover.
(Refer to Engine And Transaxle Assembly - "Engine Cover") |
| 3. |
Remove the engine room cover.
(Refer to Engine And Transaxle Assembly - "Engine Cover") |
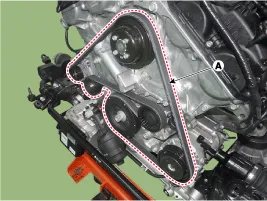
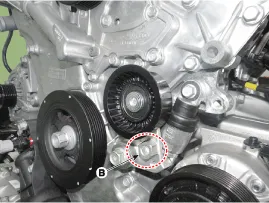
| 4. |
Turn the tensioner (B) clockwise and loosen it, then remove the drive belt (A).
|

| 5. |
To install, reverse the removal procedure. |
| Inspection |
Inspect Drive Belt
Visually check the belt for excessive wear, frayed cords etc.
If any defect has been found, replace the drive belt.
Cracks on the rib side of a belt are considered acceptable.
If the belt has chunks missing from the ribs, it should be
replaced. |

Drive belt, Idler, Belt tensioner pulley
| 1. |
Check the idler for excessive oil leakage, abnormal rotation or vibration. Replace the idler if necessary. |
| 2. |
Check the belt tensioner for excessive dust, crack, and damage and inspect it Replace if necessary. |
| 3. |
Check the belt replacement cycle, and inspect the belt for the abnormal wear of v-ripped part and uneven wear if necessary. |
| 4. |
Check the crankshaft pulley, auxiliary pulley for vibration
when rotating, and V-ribbed part for foreign materials or uneven
contact. Replace the components if necessary. |
Components 1. Drive belt2. Drive belt tensioner3. Crankshaft pulley4. Water pump pulley5. Idler6. Cylinder head cover7. Exhaust camshaft OCV cap 1.
Components 1. Idler
Other information:
Hyundai Genesis (DH) 2013-2016 Service Manual: Components and Components Location
C
Hyundai Genesis (DH) 2013-2016 Service Manual: Cluster Ionizer Repair procedures
Inspection 1. Press the MODE switch more than 4 times within 2 seconds while pressing the OFF switch. DisplayFail description00Normal51Cluster ion generator fault * For diagnostic procedure, refer to DTC guide. Replacement 1. Disconnect the negative (-) battery terminal.
Categories
- Manuals Home
- Hyundai Genesis Owners Manual
- Hyundai Genesis Service Manual
- Repair procedures
- Parking Assist Sensor Repair procedures
- Body Electrical System
- New on site
- Most important about car

Copyright © 2026 www.hgenesisdh.com - 0.0227