Hyundai Genesis (DH): Airbag Module / Curtain Airbag (CAB) Module Repair procedures
Hyundai Genesis (DH) 2013-2016 Service Manual / Restraint / Airbag Module / Curtain Airbag (CAB) Module Repair procedures
| Removal |
| 1. |
Disconnect the battery negative cable and wait for at least 3 minutes before beginning work. |
| 2. |
Remove the roof trim assembly.
(Refer to Body - "Roof Trim Assembly") |
| 3. |
Disconnect the curtain airbag harness connector.
|
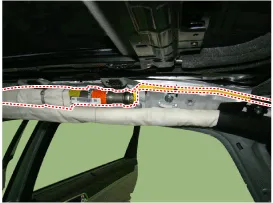
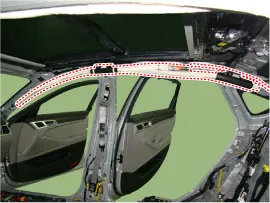
| 4. |
After loosening the mounting bolts remove the curtain airbag.
|
| Installation |
| 1. |
Turn the ignition switch OFF. |
| 2. |
Disconnect the battery negative cable and wait for at least three minutes. |
| 3. |
Tighten the curtain airbag mounting bolts.
|

| 4. |
Connect the curtain airbag connector. |
| 5. |
Install the roof trim assembly.
(Refer to Body - "Roof Trim Assembly") |
| 6. |
Reconnect the battery negative cable. |
| 7. |
After installing the curtain airbag (CAB), confirm proper system operation:
Turn the ignition switch ON; the SRS indicator light should turn on for about six seconds and then go off. |
Description The Knee Airbag (KAB) is installed inside the crash pad lower panel and protects the driver in the event of a frontal crash. The SRSCM determines if and when to deploy the KAB.
Other information:
Hyundai Genesis (DH) 2013-2016 Service Manual: Specifications
S
Hyundai Genesis (DH) 2013-2016 Service Manual: Head Up Display Unit Repair procedures
Removal 1. Disconnect the negative (-) battery terminal. 2. Remove the head up display bezel (A). 3. Remove the instrument cluster. (Refer to Indicators And Guages - "Instrument Cluster") 4. Remove the head up display unit bracket (A) after loosening the mounting nuts.
Categories
- Manuals Home
- Hyundai Genesis Owners Manual
- Hyundai Genesis Service Manual
- Restraint
- Steering System
- General Information
- New on site
- Most important about car

Copyright © 2026 www.hgenesisdh.com - 0.0248