Hyundai Genesis (DH): Windshield Wiper/Washer / Front Washer Motor Repair procedures
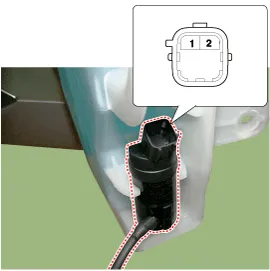
| Inspection |
| 1. |
With the washer motor connected to the reservoir tank, fill the reservoir tank with water.
|

| 2. |
Connect positive (+) battery cables to terminal 2 and negative (-) battery cables to terminal 1 respectively. |
| 3. |
Check that the motor operates normally and the washer motor runs and water sprays from the front nozzles. |
| 4. |
If they are abnormal, replace the washer motor.
[Front & Rear washer]
|
| 1. |
Disconnect the negative(-) battery terminal. |
| 2. |
Drain the washer tank until the washer fluid is less than 650cc. |
| 3. |
Check for continuity between the No. 1 and No.2 terminal in each float position.
There should be continuity when the float is down.
There should be no continuity when the float is up. |
| 4. |
If the continuity is not as specified, replace the washer fluid level switch
|

| Removal |
|

| 1. |
Disconnect the negative (-) battery terminal. |
| 2. |
Remove the right wheel house cover. |
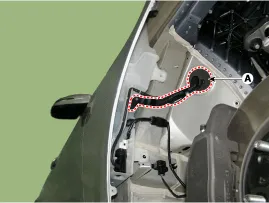
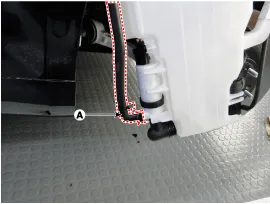
| 3. |
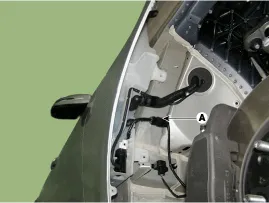
Remove the hose (A) for washer reservoir inlet removal.
|
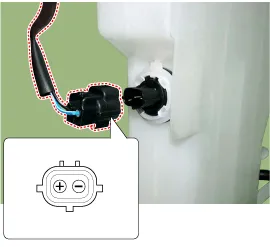
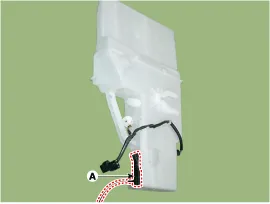
| 4. |
Disconnect the connector (A).
|
| 5. |
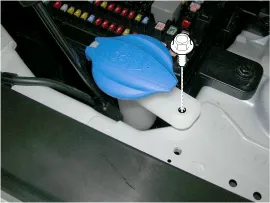
Remove the reservoir washer inlet (A) after loosening the mounting bolt.
|
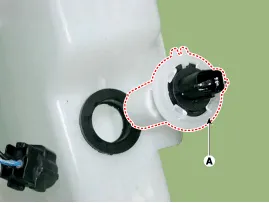
| 6. |
loosening the mounting bolt (A).
|
| 7. |
Remove the washer reservoir. |
| 8. |
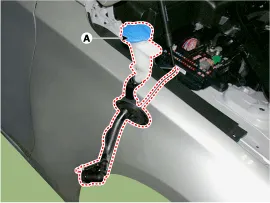
Remove the head lamp washer hose (A)
|
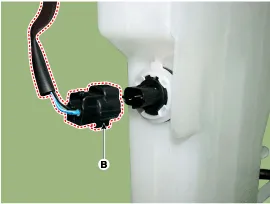
| 9. |
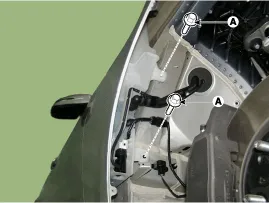
Disconnect the washer motor connector (A) and level sensor connector (B).
|
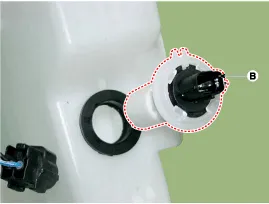
| 10. |
Remove the washer motor and level sensor switch (B).
|
| Installation |
| 1. |
Reassemble the washer reservoir.
|
| 2. |
Install the washer reservoir. |
| 3. |
Connect the washer motor connector and washer hose. |
| 4. |
Reassemble the right wheel house cover. |
Removal 1. Disconnect the negative (-) battery terminal. 2. Remove the windshield wiper arm (A) and blade after removing a nut. 3. If necessary of removing the wiper blade, push both sides of wiper tabs (A) and then remove the wiper blade.
Removal Head Lamp Washer Motor - When servicing the washer pump, be careful not to damage the washer pump seal. - Do not operate the washer pump before filling the washer reservoir.
Other information:
Hyundai Genesis (DH) 2013-2016 Service Manual: In-car Sensor Description and Operation
Description An in-car air temperature sensor is located in the crash pad lower panel. The sensor contains a thermistor which measures the temperature of the cabin. The signal determined by the resistance value which changes in accordance with perceived inside temperature, is delivered to the heater control unit and according to this signa
Hyundai Genesis (DH) 2013-2016 Service Manual: Console Temperature Control Actuator Repair procedures
Inspection 1. Turn the ignition switch OFF. 2. Disconnect the console temperature control actuator connector. 3. Verify that the console temperature control actuator operates to the defrost mode when connecting 12V to terminal 3 and grounding terminal 4.
Categories
- Manuals Home
- Hyundai Genesis Owners Manual
- Hyundai Genesis Service Manual
- Brake System
- Transmission Control Module (TCM) Repair procedures
- Smart Cruise Control Unit Repair procedures
- New on site
- Most important about car
