Hyundai Genesis (DH): Airbag Module / Driver Airbag (DAB) Module and Clock Spring Repair procedures
Hyundai Genesis (DH) 2013-2016 Service Manual / Restraint / Airbag Module / Driver Airbag (DAB) Module and Clock Spring Repair procedures
| Removal |
| 1. |
Disconnect the battery negative cable and wait for at least three minutes before beginning work. |
| 2. |
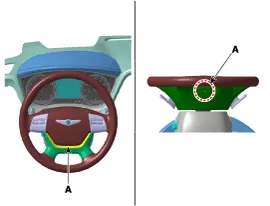
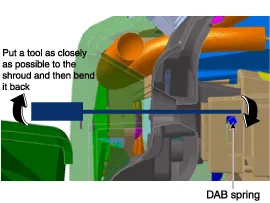
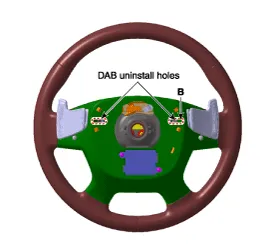
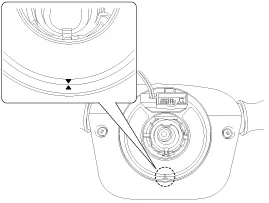
Put a flat tool(O4mm) into a guide hole located in the bottom of steering wheel and press a spring.
|


| 3. |
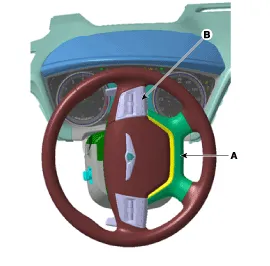
Turn a steering wheel anti-clockwise, so make a guide hole(A) shown on the rightside.
Put a tool into a hole(B) and bend back a fixed DAB spring.
Make sure to pull DAB cover when bend back the spring.
|

| 4. |
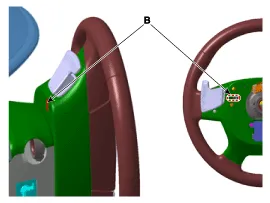
Turn a steering wheel clockwise. Put a tool into a hole(B) and bend back a fixed DAB spring. Make sure to pull DAB cover when
|

| 5. |
Remove the steering wheel.
(Refer to Steering System - "Steering Column and Shaft") |
| 6. |
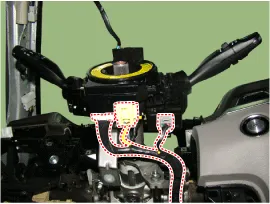
Loosen the steering wheel column cover mounting screws and remove the cover.
|

| 7. |
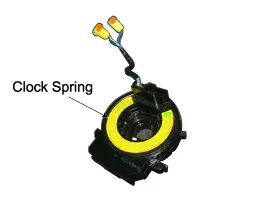
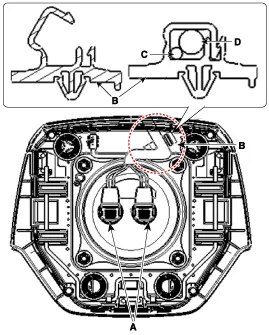
Disconnect the clock spring and horn connector, then remove the clock spring.
|
| Inspection |
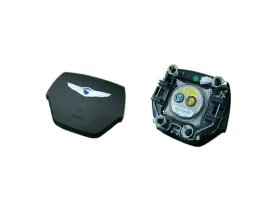
Driver Airbag (DAB)
If any improper parts are found during the following inspection, replace the airbag module with a new one.
Never attempt to measure the circuit resistance of the airbag
module (squib) even if you are using a specified tester. If the circuit
resistance is measured with a tester, accidental airbag deployment will
result in serious personal injury.
|
| 1. |
Check pad cover for dents, cracks or deformities. |
| 2. |
Check the airbag module for denting, cracking or deformation. |
| 3. |
Check hooks and connectors for damage, terminals for deformities, and harness for binds. |
| 4. |
Check airbag inflator case for dents, cracks or deformities.
|
Clock Spring
| 1. |
If any improper parts are found during inspection, replace the clock spring with a new one. |
| 2. |
Check connectors and protective tube for damage, and terminals for deformities.
|
| Installation |
| 1. |
Set the front tires straight-ahead. |
| 2. |
Turn the ignition switch OFF. |
| 3. |
Disconnect the battery negative cable from the battery and wait for at least three minutes before beginning the work. |
| 4. |
Connect the clock spring harness connector and horn harness connector to the clock spring. |
| 5. |
Centralise the clock spring.
|
| 6. |
Install the steering wheel column shroud and the steering wheel.
(Refer to Steering System - "Steering Column and Shaft") |
| 7. |
Connect the driver airbag (DAB) module connector and horn
connector, and then install the driver airbag (DAB) module on the
steering wheel.
|
| 8. |
Install the air bag module. |
| 9. |
Reconnect the battery(-) cable. |
| 10. |
After replacing the airbag module, air bag systems and should verify that it is working horn.
|
Components 1. Driver Airbag (DAB)2. Steering Wheel3. Clock Spring
Description Passenger Airbag (PAB) module is located in the passenger crash pad. This PAB contains 2 firing squibs of airbag and 1 firing squib of active vent.
Other information:
Hyundai Genesis (DH) 2013-2016 Service Manual: Components and Components Location
C
Hyundai Genesis (DH) 2013-2016 Service Manual: Description and Operation
Description Control Function This system supports 2 kinds of main function. (Rear video display function, Expected trace of wheels display function) The Rear video display and the expected trace of wheels display operate according to Vehicle speed condition and Gear position.
Categories
- Manuals Home
- Hyundai Genesis Owners Manual
- Hyundai Genesis Service Manual
- Restraint
- Steering System
- Engine Electrical System
- New on site
- Most important about car

Copyright © 2026 www.hgenesisdh.com - 0.0273