Hyundai Genesis (DH): Airbag Module / Curtain Airbag (CAB) Module Repair procedures
| Removal |
| 1. |
Disconnect the battery negative cable and wait for at least 3 minutes before beginning work. |
| 2. |
Remove the roof trim assembly.
(Refer to Body - "Roof Trim Assembly") |
| 3. |
Disconnect the curtain airbag harness connector.
|
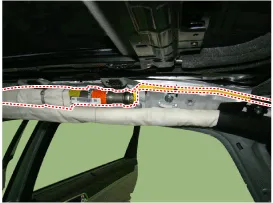
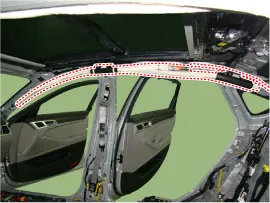
| 4. |
After loosening the mounting bolts remove the curtain airbag.
|
| Installation |
| 1. |
Turn the ignition switch OFF. |
| 2. |
Disconnect the battery negative cable and wait for at least three minutes. |
| 3. |
Tighten the curtain airbag mounting bolts.
|

| 4. |
Connect the curtain airbag connector. |
| 5. |
Install the roof trim assembly.
(Refer to Body - "Roof Trim Assembly") |
| 6. |
Reconnect the battery negative cable. |
| 7. |
After installing the curtain airbag (CAB), confirm proper system operation:
Turn the ignition switch ON; the SRS indicator light should turn on for about six seconds and then go off. |
Description The Knee Airbag (KAB) is installed inside the crash pad lower panel and protects the driver in the event of a frontal crash. The SRSCM determines if and when to deploy the KAB.
Other information:
Hyundai Genesis (DH) 2013-2016 Service Manual: Auto Defogging Actuator Description and Operation
Description The auto defogging sensor is installed on front window glass. The sensor judges and sends signal if moisture occurs to blow out wind for defogging. The air conditioner control module receives a signal from the sensor and restrains moisture and eliminates defog by the intake actuator, A/C, auto defogging actuator, blower motor
Hyundai Genesis (DH) 2013-2016 Service Manual: Auto Defogging Actuator Repair procedures
Inspection 1. Turn the ignition switch OFF. 2. Disconnect the auto defogging connector. 3. Verify that the auto defogging actuator operates to the open position when connecting 12V to terminal 3 and grounding terminal 4. Verify that the auto defogging actuator operates to the close position when connected in reverse.
Categories
- Manuals Home
- Hyundai Genesis Owners Manual
- Hyundai Genesis Service Manual
- Emission Control System
- Steering System
- Electric Parking Brake (EPB) Repair procedures
- New on site
- Most important about car
