Hyundai Genesis: Air Conditioning System / A/C Pressure Transducer Repair procedures
Hyundai Genesis (DH) 2013-2016 Service Manual / Heating, Ventilation and Air Conditioning / Air Conditioning System / A/C Pressure Transducer Repair procedures
| Inspection |
| 1. |
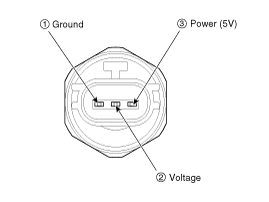
Measure the pressure of high pressure line by measuring voltage output between terminal “1” and “2”.
|
| 2. |
Inspect the voltage value whether it is the regular value or not.
|
| 3. |
If the measured voltage value is not within the specification, replace the A/C pressure transducer. |
| Replacement |
| 1. |
Disconnect the negative (-) battery terminal. |
| 2. |
Recover the refrigerant with a recovery/charging station. |
| 3. |
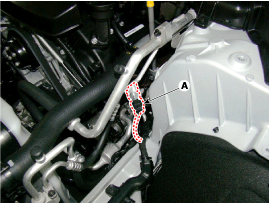
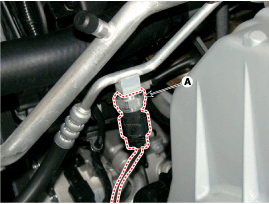
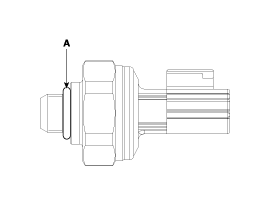
Disconnect the A/C pressure transducer connector (A).
|
| 4. |
Remove the A/C pressure transducer (A).
|

| 5. |
Install in the reverse order of removal.
|

 A/C Pressure Transducer Description and Operation
Description
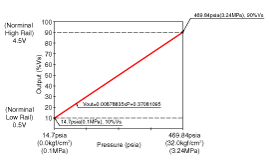
The A/C Pressure Transducer (APT) converts the pressure value
of high-pressure line into voltage value after measuring it. By
converted voltage value, engine ECU controls the coolin ...
 Evaporator Temperature Sensor Description and Operation
Description
The evaporator temperature sensor will detect the evaporator
core temperature and interrupt compressor relay power in order to
prevent evaporator from freezing due to excessive cool ...
Other information:
Hyundai Genesis (DH) 2013-2016 Service Manual: Variable Intake Solenoid(VIS) Actuator Repair procedures
Removal and Installation 1. Disconnect the battery "-" terminal from the trunk room. 2. Remove the engine cover. (Refer to Engine And Transaxle Assembly - "Engine Cover") 3. Remove the VIS actuator (A). Tightening torque : 3.9~ 5.9 N.m (0.4 ~ 0.6 kgf.m, 2.9 ~ 4.3 Ib-ft) 4. To ...
Hyundai Genesis (DH) 2013-2016 Service Manual: Schematic Diagrams
Circuit Diagram 1. Connector terminal TypePin NoDescriptionBattery1Battery -2Battery +Vhicle1-2-3-4-5-6-7IGN8High_CAN9Low_CAN10-11-12- 2. Circuit Diagram ...
© 2013-2025 www.hgenesisdh.com
