Hyundai Genesis: Ignition System / Spark Plug Repair procedures
1. |
Accelerate the engine to about 3,000 rpm for 3 minutes or longer. |
2. |
Remove the spark plug. |
3. |
Check the spark plug visually.
If the electrode is dry, the spark plug is normal.
If the electrode is wet, check the damage and electrode gap as below. |
1. |
Check the spark plug for any damage on its thread and insulator.
If there is damage, replace the spark plug. |
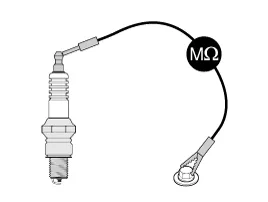
2. |
Check the electrode. Measure the insulation resistance with an ohmmeter.
If the resistance is less than the specified value, adjust the electrode gap.
Specification: 10 M? or more
|

|
3. |
Check the spark plug electrode gap.
If the gap is greater than the maximum, replace the spark plug.
Specification: 1.0 ~ 1.1 mm ( 0.0394 ~ 0.0433 in.)
|
• |
When adjusting the gap of a new spark plug, bend only the base of the ground electrode. Do not touch the tip.
Never attempt to adjust the gap on a plug being used. |
|

|
The combustion temporarily becomes unstable, due to the aged
fuel and the carbon deposits accumulated on the spark plug(s) after
long-term storage.
1. |
Start the engine and keep the engine running at idle for 2 minutes. |
2. |
Step on the accelerator pedal and hold it steady at 4500 rpm
with the shift lever in N position to warm up the engine until the
temperature of the engine coolant reaches 80°C. |
3. |
Keep the engine running at 2500~3000 rpm in the N position for 15 minutes. 
|
• |
The 2nd method should be performed only if the 1st method fails (the misfire-related codes recur).
|
|
1. |
Start the engine and keep the engine running at idle for 2 minutes. |
2. |
Drive the vehicle for over 20 minutes, keeping the engine speed above 3500 rpm.
• |
If equipped with manual transaxle, shift the gear properly to keep the engine speed above 3500 rpm. |
|

|
1. |
Remove the ignition coil.
(Refer to Ignition System - "Ignition Coil") |
2. |
Using a spark plug wrench, remove the spark plug (A).
• |
Be careful of foreign materials not to enter the spark plug holes. |
|
[Bank 1] 
[Bank 2] 
|
1. |
Install in the reverse order of removal.
Tightening torque:
14.7 ~ 24.5 N.m (1.5 ~ 2.5 kgf.m, 10.9 ~ 18.0 Ib-ft)
|
|
Specification
ItemSpecificationTypeDILKR7A11Gap 1.0 ~ 1.1 mm (0.0394 ~ 0.0433 in.)
...
Other information:
Removal and Installation
1.
Remove the lower oil pan.
(Refer to Lubrication System - "Oil pan")
2.
Remove the upper oil pan.
3.
Remove the bolt (A) and then separate the chain with sprocket from the oil pump.
Tightening torque :
19.6 ~ 24.5 N.m (2.0 ~ 2.5 kgf.m, 14.5 ~ 18.1 lb ...
Check SCC radar
If the sensor or cover is dirty or
obscured with foreign matter such as
snow, the message will appear.
Clean the sensor or cover by using a
soft cloth.
Check SCC System
• This warning message illuminates
if there is a malfunction with the
advanced smart cruise co ...