Hyundai Genesis: Smart Cruise Control System / Smart Cruise Control Unit Repair procedures

Removal
1.
Remove the bumper.
(Refer to Body - "Front Bumper")
2.
Disconnect the smart cruise control unit connector.
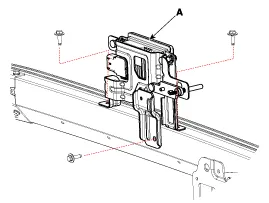
3.
Remove the smart cruise control unit assembly (A) from vehicle after loosening mounting bolts.

Installation
1.
Install in the reverse order of removal.
   
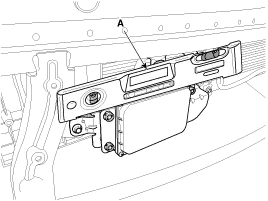
When installing the sensor, align the direction of sensor with the vehicle motion vector and adjust the upside of sensor horizontally using level meter (A).

1.
Align the smart cruise control sensor.
(Refer to "Smart Cruise Control Sensor Alignment")
2.
Install the bumper cover.
(Refer to Body - "Front Bumper Cover")
Smart Cruise Control (SCC) Sensor Alignment
The objective of the alignment is to ensure correct SCC performance. In order for the sensor to perform properly, the sensor must be aligned precisely. The sensor alignment has major impact on road estimation, lane prediction, and target processing. When the sensor is misaligned, the performance of SCC cannot be guaranteed. Therefore, if the sensor needs to be reinstalled or a new sensor to be installed on a vehicle, the sensor shall be aligned by service personnel.
   
The sensor must be aligned when;
The sensor is reinstalled after removal
A new sensor is installed on a vehicle.
The sensor or neighboring parts are affected by a collision.
The sensor can not recognize a vehicle ahead.
   
The sensor can not recognize a vehicle ahead.
Remove heavy objects, such as luggage in the trunk, from the vehicle.
Check wheel alignment.
Check the pollution condition of sensor cover
Radar sensor should be aligned in vertical and horizontal direction. Vertical alignment should be performed using level/tilt meter and horizontal alignment should be performed by driving on a road.
1.
To maintain the horizontal condition between a vehicle and ground, park a vehicle on a lift or level ground.
2.
Remove the bumper cover.
(Refer to Body - "Front Bumper Cover")
3.
Check out the vertical alignment of sensor using a level/tilt meter. (Tolerance: ±1.25° less)
If verticality of the sensor is out of the tolerance, turn the adjustment screw (B) to adjust it within the tolerance.

   
For the vertical sensor alignment, use a digital tilt meter for better accuracy. If not available, a bubble meter can be used.
4.
Install the bumper cover.
(Refer to Body - "Front Bumper Cover")
5.
To perform the horizontal sensor alignment, connect GDS after starting the engine and choose “SCC Alignment”
   
Erase the DTC code before the sensor alignment procedure.
6.
Select “Driving Mode” to start sensor alignment.

7.
Drive the vehicle after the alignment is initiated on the GDS. Check the red light of instrument cluster is on.

   
The sensor alignment will last about 5~15 minutes. Depending on the traffic situation or road condition, the duration of the procedure can shorten or extend.
To complete the alignment in minimum time, if it is possible, drive the vehicle considering the driving/road conditions as follows.
To shorten the duration of the alignment;
-
Drive at more than 65km/h (40.4mph).
-
Drive on a straight road without any curve and incline.
-
Drive on a thick and wide asphalt road.
-
Drive on a road with repetitive static targets.
-
Drive on a dry road in good condition without rain or snow on it.
The alignment process can be interrupted when any of the following conditions exists;
-
When the vehicle encounters a curve with a radius smaller than 100m (328.0ft).
-
Drive below minimum required speed or stop (waiting at a red light, etc.)
-
When the vehicle is in a tunnel or under overpass.
-
When there are excessive steering wheel actions such as turning to the right or left and sudden lane change.
-
Drive on a road with few repetitive static targets.
   
When driving the vehicle for sensor alignment, be careful of the following;
Observe a speed regulation on the road.
Do not stick to the previous driving/road conditions excessively to shorten the duration of the alignment. Drive the vehicle safely considering traffic situations.
When driving the vehicle, do not operate the GDS and look at the GDS display for a long time. You can lose your focus on steering control.
Operate the GDS only when the vehicle stops.
8.
After the sensor alignment is completed, the instrument cluster warning light goes off.
   
If sensor alignment has not completed, check horizontal angle using GDS.
If the vertical angle of the sensor is out of ±3°, check the back beam or mounting area. If there is no abnormality, replace the SCC unit with a new one.
After replacing the SCC unit with a new one, align the sensor again.
Inspection
Inspection procedures in case of smart cruise control system failure
1.
Check the bumper appearance and accidents. (Visual appearance of the vehicle, Maintenance and bumper replacement history)
> If the vehicle has been crashed, SCC mounting part is highly likely to be twisted.
[Alignment problem cases caused by minor collision]

[Normal condition]

[Poor condition]

2.
Check whether the radar sensor cover of the bumper is dirty.
> If the cover is dirty, SCC is highly likely to be canceled by the foreign substance during operation.
[Cases caused by snow smudges]

3.
After engine starting, check SCC warning massage in the cluster and DTC code. (Refer to DTC guide)
Smart Cruise Control Unit Schematic Diagrams
Circuit Diagram ...

Smart Cruise Control Switch Components and Components Location
Components 1. SET - switch2. RES + switch3. SCC switch4. CANCEL switch5. CRUISE switch ...

Other information:

Hyundai Genesis (DH) 2013-2016 Service Manual: Condenser Repair procedures


Inspection 1. Check the condenser fins for clogging and damage. If they are clogged, clean them with water, and blow them with compressed air. If they are bent, gently bend them using a screwdriver or pliers. 2. Check the condenser connections for leakage, and repair or replace it, if re ...

Hyundai Genesis (DH) 2013-2016 Service Manual: Battery Sensor Description and Operation


Description Vehicles have many control units that need large amounts of electricity. These units control their own system based on information from diverse sensors. It is important to maintain a stable power supply as these sensors give a variety of information. Battery sensor is mounte ...

© 2013-2024 www.hgenesisdh.com