Hyundai Genesis (DH): Rear Suspension System / Rear Cross Member Repair procedures
Hyundai Genesis (DH) 2013-2016 Service Manual / Suspension System / Rear Suspension System / Rear Cross Member Repair procedures
| Removal |
| 1. |
Loosen the wheel nuts slightly. Raise the vehicle, and make sure it is securely supported. |
| 2. |
Remove the front wheel and tire (A) from the rear hub.
|
| 3. |
Remove the split pin, castle nut (A) and washer from the front hub.
|
| 4. |
Remove the rear caliper.
(Refer to Brake System - "Rear Disc Brake") |
| 5. |
Remove the rear brake disc (A).
|
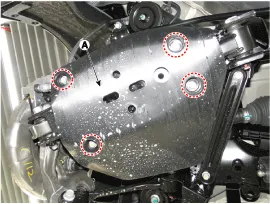
| 6. |
Loosen the bolts and remove the cover (A). [TAU]
|
| 7. |
Remove the bracket (A).
|
| 8. |
Remove the bolt (A) and ruber hanger (B), (C) to separate the muffler.
|
| 9. |
Remove the rear driveshaft.
(Refer to Driveshaft and Axle - "Rear Driveshaft Assembly") |
| 10. |
Remove the rear differential carrier.
(Refer to Driveshaft and Axle - "Differential Carrier Assembly") |
| 11. |
Remove the parking brake shoe.
(Refer to Brake System - "Parking Brake System" ) |
| 12. |
Remove the rear upper arm front & rear upper arm rear.
(Refer to Suspension System - "Rear Upper Arm") |
| 13. |
Remove the rear assist arm.
(Refer to Suspension System - "Rear Assist Arm") |
| 14. |
Remove the rear trailing arm.
(Refer to Suspension System - "Rear Trailing Arm") |
| 15. |
Remove the rear lower arm.
(Refer to Suspension System - "Rear Lower Arm") |
| 16. |
Disconnect the EPB (A) connector & cable (B).
|
| 17. |
Loosen the mounting bolts and then remove the rear cross member.
|
| 18. |
Remove the parking cable by loosening mounting bolts.
|
| 19. |
Loosen EPB mounting bolts and then remove the EPB unit.
|
| 20. |
Installation in the reverse order of removal. |
| 21. |
Check the rear wheel Alignment.
(Refer to Tires/Wheels - "Alignment") |
Removal 1. Loosen the wheel nuts slightly. Raise the vehicle, and make sure it is securely supported. 2. Remove the front wheel and tire (A) from the rear hub.
Removal 1. Loosen the wheel nuts slightly. Raise the vehicle, and make sure it is securely supported. 2. Remove the front wheel and tire (A) from the rear hub.
Other information:
Hyundai Genesis (DH) 2013-2016 Service Manual: High Mounted Stop Lamp Repair procedures
Removal High Mounted Stop Lamp 1. Disconnect the negative (-) battery terminal. 2. Remove the roof trim assembly. (Refer to Body - "Roof Trim") 3. Remove the high mounted stop lamp assembly (A) after loosening the mounting screws. Installation 1.
Hyundai Genesis (DH) 2013-2016 Service Manual: Head Up Display Unit Troubleshooting
T
Categories
- Manuals Home
- Hyundai Genesis Owners Manual
- Hyundai Genesis Service Manual
- Brake System
- Smart Cruise Control Unit Repair procedures
- Starter Repair procedures
- New on site
- Most important about car
Copyright В© 2026 www.hgenesisdh.com - 0.0345


