Hyundai Genesis (DH): Lighting System / Rear Combination Lamp Repair procedures
Hyundai Genesis (DH) 2013-2016 Service Manual / Body Electrical System / Lighting System / Rear Combination Lamp Repair procedures
| Removal |
| 1. |
Disconnect the negative (-) battery terminal. |
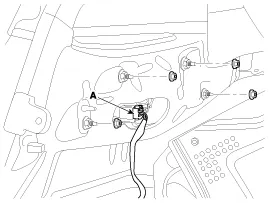
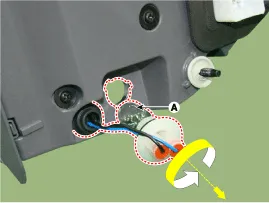
| 2. |
After loosening the nuts (4EA) holding the rear combination
lamp and disconnecting the connector (A), remove the outside rear
combination lamp assembly.
|
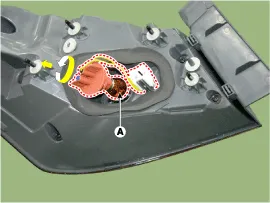
| 3. |
Remove the bulb (A) after turning it in the counter clock-wise direction.
|
| 4. |
Remove the trunk lid trim
(Refer to Body - "Trunk Lid Trim") |
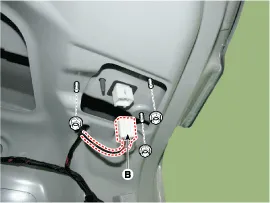
| 5. |
Remove the inside rear combination lamp assembly (A) after loosening the nuts (3EA) and disconnecting the connector.
|
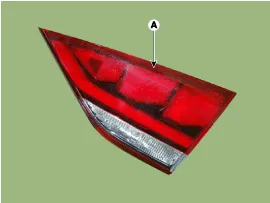
| 6. |
Remove the bulb (A) after separating the inside rear combination lamp assembly.
|
| 7. |
If it is necessary to replace the bulb, remove the bulb after removing the trunk lid trim. |
| Installation |
| 1. |
Install the inside combination lamp assembly after assembling the bulb. |
| 2. |
Install the rear combination lamp assembly after assembling the bulbs and connecting the lamp connector. |
Removal High Mounted Stop Lamp 1. Disconnect the negative (-) battery terminal. 2. Remove the roof trim assembly. (Refer to Body - "Roof Trim") 3.
Other information:
Hyundai Genesis (DH) 2013-2016 Service Manual: Components and Components Location
C
Hyundai Genesis (DH) 2013-2016 Service Manual: Description and Operation
Description Control Function This system supports 2 kinds of main function. (Rear video display function, Expected trace of wheels display function) The Rear video display and the expected trace of wheels display operate according to Vehicle speed condition and Gear position.
Categories
- Manuals Home
- Hyundai Genesis Owners Manual
- Hyundai Genesis Service Manual
- Restraint
- Steering System
- 4 Wheel Drive (AWD) System
- New on site
- Most important about car

Copyright © 2026 www.hgenesisdh.com - 0.028