Hyundai Genesis: Rear Suspension System / Rear Assist Arm Repair procedures
Hyundai Genesis (DH) 2013-2016 Service Manual / Suspension System / Rear Suspension System / Rear Assist Arm Repair procedures
| Removal |
| 1. |
Loosen the wheel nuts slightly. Raise the vehicle, and make sure it is securely supported. |
| 2. |
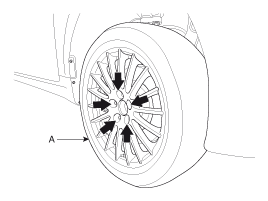
Remove the front wheel and tire (A) from the rear hub.
|

| 3. |
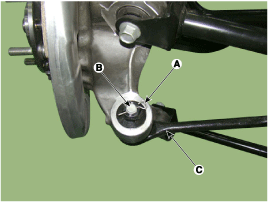
Remove the split pin (A) and nut (B).And using SST (09568-2J100), separate the assist arm (C).
|

| 4. |
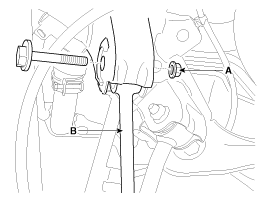
Disconnect the rear assist arm (B) from the rear sub frame by loosening the bolt & nut (A).
|
| 5. |
Installation in the reverse order of removal. |
| 6. |
Check the alignment.
(Refer to Tires/Wheels - "Alignment") |
| Inspection |
| 1. |
Check the bushing for wear and deterioration. |
| 2. |
Check the ball joint for rotating torque. |
| 3. |
Check the assist arm for deformation. |
 Rear Upper Arm Repair procedures
Removal
1.
Loosen the wheel nuts slightly. Raise the vehicle, and make sure it is securely supported.
2.
Remove the front wheel and tire (A) from the rear hub.
Tightening torque:
88.3 ~ 10 ...
 Trailing Arm Repair procedures
Removal
1.
Loosen the wheel nuts slightly. Raise the vehicle, and make sure it is securely supported.
2.
Remove the front wheel and tire (A) from the rear hub.
Tightening torque:
88.3 ~ 10 ...
Other information:
Hyundai Genesis (DH) 2013-2016 Service Manual: Power Window Switch Repair procedures
Inspection Diagnosis With GDS 1. In the body electrical system, failure can be quickly diagnosed by using the vehicle diagnostic system (GDS). (1) Self diagnosis : Checking failure and code number (DTC) (2) Current data : Checking the system input/output data state (3) Actuation test ...
Hyundai Genesis (DH) 2013-2016 Service Manual: Wheel Repair procedures
Wheel Runout 1. Jack up the vehicle and support it with jack stands. 2. Measure the wheel runout with a dial indicator as illustrated. 3. Replace the wheel if the wheel runout exceeds the limit. LimitRadialAxialRunout mmAluminum0.30.3 Wheel Nut Tightening 1. Tightening torque. ...
© 2013-2025 www.hgenesisdh.com
