Hyundai Genesis (DH): Power Trunk Module / Power Latch Assembly Repair procedures
Hyundai Genesis (DH) 2013-2016 Service Manual / Body Electrical System / Power Trunk Module / Power Latch Assembly Repair procedures
| Removal |
| 1. |
Disconnect the negative (-) battery terminal. |
| 2. |
Remove the trunk lid trim after opening the trunk.
(Refer to Body - "Trunk Lid Trim") |
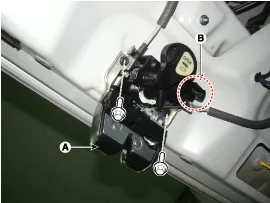
| 3. |
Remove the power latch (A) after disconnecting the connector (B) and mounting bolts.
|
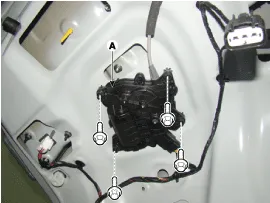
| 4. |
Remove the power cinching actuator (A) after disconnecting connector and mounting bolts.
|
| Installation |
| 1. |
Install the power latch after connecting the connector and mounting bolts. |
| 2. |
Install the trunk trim. |
| 3. |
Check that the power trunk module operates normally after connecting the negative (-) battery terminal. |
| Inspection |
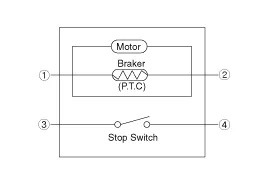
| 1. |
Disconnect the power latch and cinching connectors.
|
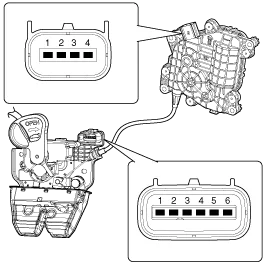
| 2. |
Connect the power latch terminals directly to battery voltage (12V) and check that the motor operates smoothly.
|
| 3. |
Connect the power cinching terminals directly to battery voltage (12V) and check that the motor operates smoothly.
|
Power Latch Assembly Inspection with GDS
| 1. |
In the body electrical system, failure can be quickly diagnosed by using the vehicle diagnostic system (GDS).
|
| 2. |
Select the 'Car model' and the system to be checked in order to check the vehicle with the tester. |
| 3. |
Select the 'Power Trunk Module(PTM)' to check the Power trunk module(PTM). |
| 4. |
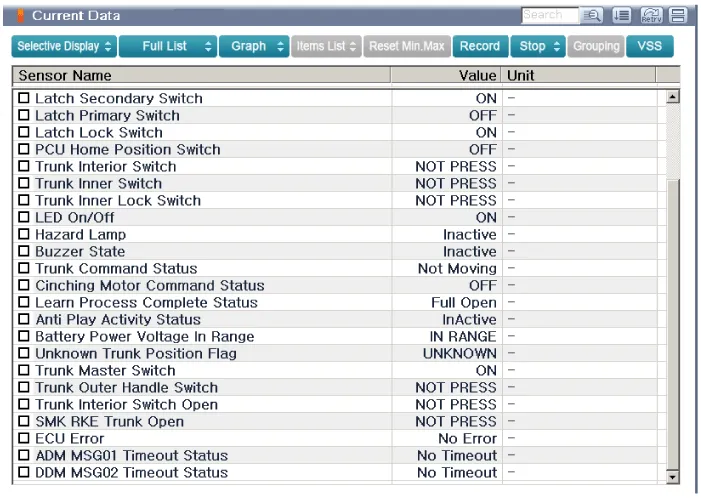
Select the "Current date" menu to search the current state of the input/output data.
The input/output data for the sensors corresponding to the Power Trunk Module(PTM) can be checked.
|
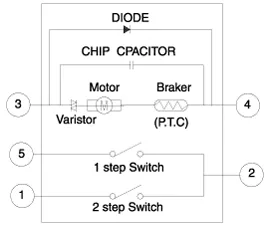
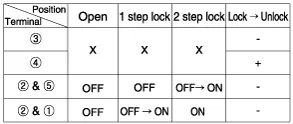
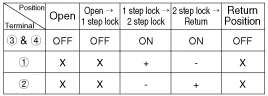
Description 1. Power latch lock flow A. When the trunk being open closes, the striker get locked. B. The CLAW rotates (1st step close). C.
Other information:
Hyundai Genesis (DH) 2013-2016 Service Manual: Compressor Components and Components Location
C
Hyundai Genesis (DH) 2013-2016 Service Manual: Auto Defogging Actuator Repair procedures
Inspection 1. Turn the ignition switch OFF. 2. Disconnect the auto defogging connector. 3. Verify that the auto defogging actuator operates to the open position when connecting 12V to terminal 3 and grounding terminal 4. Verify that the auto defogging actuator operates to the close position when connected in reverse.
Categories
- Manuals Home
- Hyundai Genesis Owners Manual
- Hyundai Genesis Service Manual
- 4 Wheel Drive (AWD) System
- Body Electrical System
- Components and Components Location
- New on site
- Most important about car

Copyright © 2026 www.hgenesisdh.com - 0.0277