Hyundai Genesis: Front seats / Power adjustment
The front seat can be adjusted by using the control switches located on the outside of the seat cushion. Before driving, adjust the seat to the proper position so that you can easily control the steering wheel, foot pedals and controls on the instrument panel.
WARNING
NEVER allow children in the vehicle unattended. The power seats are operable when the engine is turned off.
CAUTION
To prevent damage to the seats:
- Always stop adjusting the seats when the seat has been adjusted as far forward or rearward as possible.
- Do not adjust the seats longer than necessary when the engine is turned off. This may result in unnecessary battery drain.
- Do not operate two or more seats at the same time. This may result in an electrical malfunction.
Forward and rearward adjustment
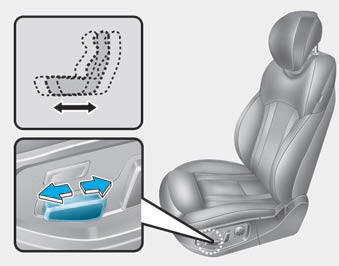
To move the seat forward or rearward:
1. Push the control switch forward or rearward.
2. Release the switch once the seat reaches the desired position.
Seat cushion length adjustment (for driver's seat, if equipped)
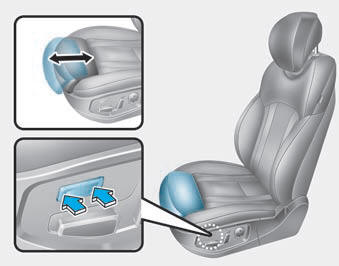
To move the front part of cushion forward:
1. Push the front part of control switch to move the seat cushion to the desired length.
2. Release the switch once the seat cushion reaches the desired length.
To move the front part of cushion rearward:
1. Push the rear part of control switch to move the seat cushion to the desired length.
2. Release the switch once the seat cushion reaches the desired length.
Seatback angle
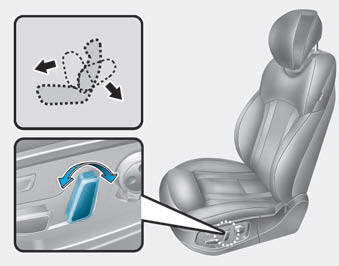
To recline the seatback:
1. Push the control switch forward or rearward.
2. Release the switch once the seatback reaches the desired position.
Reclining seatback
Sitting in a reclined position when the vehicle is in motion can be dangerous. Even when buckled up, the protections of your restraint system (seat belts and air bags) is greatly reduced by reclining your seatback.
WARNING
NEVER ride with a reclined seatback when the vehicle is moving.
Riding with a reclined seatback increases your chance of serious or fatal injuries in the event of a collision or sudden stop.
Driver and passengers should ALWAYS sit well back in their seats, properly belted, and with the seatbacks upright.
Seat belts must be snug against your hips and chest to work properly. When the seatback is reclined, the shoulder belt cannot do its job because it will not be snug against your chest. Instead, it will be in front of you. During an accident, you could be thrown into the seat belt, causing neck or other injuries.
The more the seatback is reclined, the greater chance the passenger’s hips will slide under the lap belt or the passenger’s neck will strike the shoulder belt.
Seat cushion height
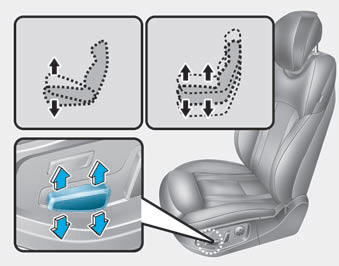
To change the height of the seat cushion:
1. Pull the front portion of the control switch up to raise or push down to lower the front part of the seat cushion. Pull the rear portion of the control switch up to raise or push down to lower the seat cushion.
2. Release the switch once the seat reaches the desired position.
Lumbar support
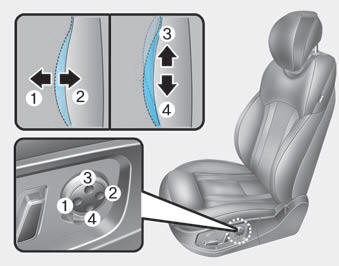
- The lumbar support can be adjusted by pressing the lumbar support switch.
- Press the front portion of the switch (1) to increase support or the rear portion of the switch (2) to decrease support.
- To move the support position up or down, press switch (3) or (4).
According to the equipped feature, the lumbar support does not operate up or down when the lumbar support is in the rearmost position.
In this case, to use the system, slightly increase support by pushing the front portion of the switch (1).
Seat bolster adjustment (for driver’s seat, if equipped)
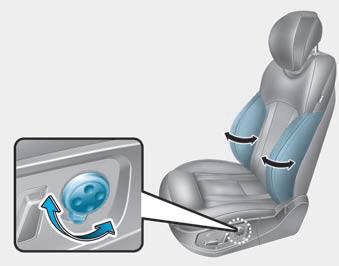
To change the height of seat bolster:
1. Pull or push the lever.
2. Release the lever once the bolster reaches the desired position.
 Front seats
WARNING
Take the following precautions
when adjusting your seat:
NEVER attempt to adjust the
seat while the vehicle is moving.
The seat could respond
with unexpected movement
and ma ...
 Seatback pocket
The seatback pocket is provided on
the back of the front seatbacks.
WARNING
To prevent the occupant classification
system from malfunctioning:
Do not hang onto the front passenger’s
seatb ...
Other information:
Hyundai Genesis (DH) 2013-2016 Service Manual: Front Disc Brake Repair procedures
Removal [4 Piston Type] 1. Remove the front wheel & tire. Tightening torque: 88.3 ~ 107.9 N.m (9.0 ~ 11.0 kgf.m, 65.1 ~ 79.6 lb-ft) 2. Remove the brake hose mounting bracket (A). 3. Remove the cover plate (A) by loosening the bolts. Tightening torque 7.8 ~ 10.8 N.m (0.8 ...
Hyundai Genesis (DH) 2013-2016 Owners Manual: Electric parking brake (EPB)
Applying the parking brake To apply the EPB (Electric Parking Brake): 1.Depress the brake pedal. 2.Pull up the EPB switch. Make sure the Parking Brake Warning Light comes on. Also, the EPB is applied automatically if the [AUTO HOLD] switch is on when the engine is turned off. Howeve ...
