
Hyundai Genesis (DH): General Information / Special Service Tools
Hyundai Genesis (DH) 2013-2016 Service Manual / Engine Mechanical System / General Information / Special Service Tools
| Special Service Tools |
| Tool Name / Number | Illustration | Description |
| Crankshaft front oil seal installer 09231-3C100 |
| Front oil seal mounting |
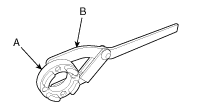
| Crankshaft pulley fixing tool (09231-1S100) Crankshaft pulley fixed tool handle (09231-2J210) |
| Remove the crankshaft damper pulley and mounting bolts A : 09231-1S100 B : 09231-2J210 |
| Torque angle adapter 09221-4A000 |
| Used for tightening torque-to-yield fasteners to a specified angle |
| Valve stem seal remover 09222-29000 |
| |
| Valve stem seal installer 09222-2W100 |
| Mounting of the valve stem seals |
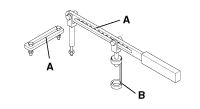
| Valve spring compressor A : 09222-3K000 (Compressor) B : 09222-3K100 (Holder) |
| Used for removing / installing intake or exhaust valve |
| Crankshaft rear oil seal installer A : 09231-3C200 B : 09231-H1100 |
| Mounting of the crankshaft rear oil seal |
| Oil pan remover 09215-3C000 |
| Remove the oil pan |






Troubleshooting SymptomSuspect areaRemedyEngine misfire with abnormal internal lower engine noises.Oil short or oil plethora bearing wearLoose or damaged engine drive plate.
Other information:
Hyundai Genesis (DH) 2013-2016 Service Manual: Front Fog Lamps Repair procedures
Removal 1. Disconnect the negative (-) battery terminal. 2. Remove the front bumper. (Refer to Body - "Front Bumper Cover") 3. Disconnect the front fog lamp connector (A). 4. Remove the front fog lamp assembly (A) after loosening the mounting nut.
Hyundai Genesis (DH) 2013-2016 Service Manual: Photo Sensor Repair procedures
Inspection 1. Turn the ignition switch ON. 2. Connect the GDS. 3. Emit intensive light toward the photo sensor using a lamp, and check the output voltage change. 4. The voltage will rise with higher intensive light and fall with lower intensive light.
Categories
- Manuals Home
- Hyundai Genesis Owners Manual
- Hyundai Genesis Service Manual
- Brake System
- Restraint
- 4 Wheel Drive (AWD) System
- New on site
- Most important about car

Copyright В© 2026 www.hgenesisdh.com - 0.0337