Hyundai Genesis (DH): Rear Suspension System / Rear Stabilizer Bar Repair procedures
| Removal |
| 1. |
Loosen the wheel nuts slightly. Raise the vehicle, and make sure it is securely supported. |
| 2. |
Remove the front wheel and tire (A) from the rear hub.
|


| 3. |
Loosen the bolts and remove the cover (A). [TAU]
|

| 4. |
Using a hex wrench, loosen the nut (A) while fixing the end of stabilizer link and then disconnect the link from the lower arm.
|

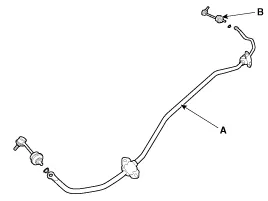
| 5. |
Loosen the mounting bolt (A) and then remove the stabilizer bar (B).
|

| 6. |
Disconnect the rear stabilizer link (B) with the stabilizer bar (A).
|
| 7. |
Installation in the reverse order of removal. |
| Inspection |
| 1. |
Check the bushing for wear and deterioration. |
| 2. |
Check all the bolts. |
| 3. |
Check the stabilizer bar for deformation. |
Removal 1. Loosen the wheel nuts slightly. Raise the vehicle, and make sure it is securely supported. 2. Remove the front wheel and tire (A) from the rear hub.
Other information:
Hyundai Genesis (DH) 2013-2016 Service Manual: Description and Operation
Description Integrated Rain Sensor Integrated rain sensor (A) controls three systems: front wiper, auto-light, and central air conditioner. 1. Wiper Control System When "AUTO" switch signal is received from the multi-function switch on the right, the integrated rain sensor detects the amount of rainfall.
Hyundai Genesis (DH) 2013-2016 Service Manual: Repair procedures
Diagnosis With GDS 1. BSD system defects can be quickly diagnosed with the GDS. GDS operates actuator quickly to monitor, input/output value and self diagnosis. 2. Connect the cable of GDS to the data link connector in driver side crash pad lower panel, and turn on the GDS.
Categories
- Manuals Home
- Hyundai Genesis Owners Manual
- Hyundai Genesis Service Manual
- General Information
- Body Electrical System
- Front Door
- New on site
- Most important about car
