
Hyundai Genesis (DH): Body Dimensions / General Information
Hyundai Genesis (DH) 2013-2016 Service Manual / Body (Interior and Exterior) / Body Dimensions / General Information
| General |
| 1. |
Basically, all measurements in this manual are taken with a tracking gauge. |
| 2. |
When a measuring tape is used, check to be sure there is no elongation, twisting or bending. |
| 3. |
For measuring dimensions, both projected dimension and actual-measurement dimension are used in this manual. |
| Measurement Method |
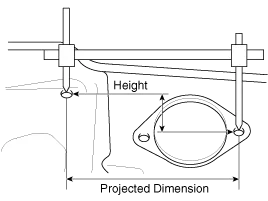
| Projected Dimensions |
| 1. |
These are the dimensions measured when the measurement
points are projected into the reference plane, and are the reference
dimensions used for body alterations. |
| 2. |
If the length of the tracking gauge probes is adjustable,
make the measurement by lengthening one probe by the amount equivalent
to the difference in height of the two surfaces.
|
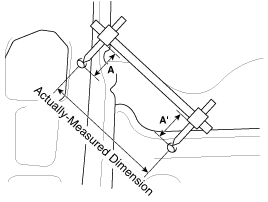
| Actual-Measurement Dimensions |
| 1. |
These dimensions indicate the actual linear distance between
measurement points, and are the reference dimensions for use if a
tracking gauge is used for measurement. |
| 2. |
Measure by first adjusting both probes to the same length (A=A').
|

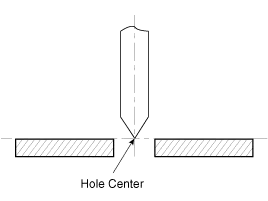
| Measurement Point |
| 1. |
Measurements should be taken at the hole center.
|
Front Body A * These dimensions indicated in this figure are actual-measurement dimensions. [ Unit : mm (inch) ] Front Body B * These dimensions indicated in this figure are actual-measurement dimensions.
Other information:
Hyundai Genesis (DH) 2013-2016 Service Manual: Rheostat Repair procedures
Inspection 1. Disconnect the negative (-) battery terminal. 2. Remove the crash pad lower panel. (Refer to Body - "Crash Pad Lower Panel") 3. Remove the lower crash pad switch assembly (A) after disengaging the mounting clip. 4. Remove the rheostat switch connector (A).
Hyundai Genesis (DH) 2013-2016 Service Manual: Components and Components Location
C
Categories
- Manuals Home
- Hyundai Genesis Owners Manual
- Hyundai Genesis Service Manual
- Engine Electrical System
- Body (Interior and Exterior)
- 4 Wheel Drive (AWD) System
- New on site
- Most important about car

Copyright В© 2026 www.hgenesisdh.com - 0.0287