
Hyundai Genesis (DH): Fuel Delivery System / Filler-Neck Assembly Repair procedures
| Removal |
| 1. |
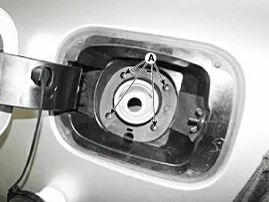
Remove the filler neck mounting screws (A) after opening the fuel filler door.
|
| 2. |
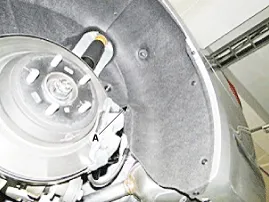
Remove the rear-left wheel & tire and wheel house cover.
|
| 3. |
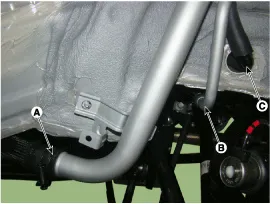
Disconnect the fuel filler hose (A) and leveling hose (B). |
| 4. |
Disconnect the vent hose quick-connector (C).
|
| 5. |
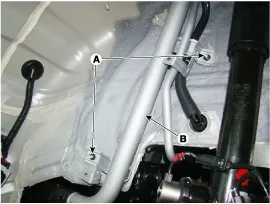
Remove the filler-neck assembly (B) from the vehicle after removing bracket mounting nuts (A).
|
| Installation |
| 1. |
To install, reverse the removal procedure.
|
Removal 1. Turn the ignition switch OFF and disconnect the negative (-) battery terminal. 2. Release the residual pressure in fuel line. (Refer to Fuel Delivery System - "Release Residual Pressure in Fuel Line") 3.
Removal 1. Turn the ignition switch OFF and disconnect the negative (-) battery cable. 2. Disconnect the accelerator position sensor connector (A).
Other information:
Hyundai Genesis (DH) 2013-2016 Service Manual: Auto Head Lamp Leveling Unit Troubleshooting
Inspection with GDS Initialization and diagnosis sequence by using GDS equipment. The following is the summarized A/S procedure. NoProcedure1Park the vehicle on level ground2Tire check3IGN1 ON4Head lamp Low Beam ON5Connection with diagnostic tool6Initial command by diagnostic tool7Clear DTC Code8IGN1 OFF > ON9Re- Connection with diagnostic t
Hyundai Genesis (DH) 2013-2016 Service Manual: Photo Sensor Description and Operation
Description The photo sensor is located in the right side of the inside rearview mirror. he integrated rain sensor is located in the right side of the inside rearview mirror. The integrated rain sensor is a multifunctional sensor which combines the photo sensor and auto light sensor, and has a built-in photovoltaic diode (for detecting t
Categories
- Manuals Home
- Hyundai Genesis Owners Manual
- Hyundai Genesis Service Manual
- Brake System
- Starter Repair procedures
- Body Electrical System
- New on site
- Most important about car
