Hyundai Genesis (DH): Engine And Transaxle Assembly / Engine Mounting Repair procedures
Hyundai Genesis (DH) 2013-2016 Service Manual / Engine Mechanical System / Engine And Transaxle Assembly / Engine Mounting Repair procedures
| Removal and Installation |
LH Engine Mounting Insulator
| 1. |
Disconnect the negative (-) battery terminal from the trunk room. |
| 2. |
Remove the engine cover. |
| 3. |
Remove the engine under cover. |
| 4. |
Remove the engine room cover and radiator grille upper cover.
(Refer to Engine And Transaxle Assembly - "Engine Cover") |
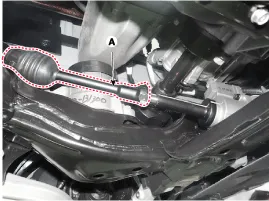
| 5. |
Remove the steering joint mounting bolts (A).
(Refer to Steering System - "Steering Column and Shaft")
|
| 6. |
Remove the engine oil level gauge.
(Refer to Lubrication System - "Oil Level Gauge & Pipe") |
| 7. |
Remove the water inlet pipe .
(Refer to Cooling System - Water Temperature Control Assembly") |
| 8. |
Remove the exhaust manifold.
(Refer to Intake and Exhaust System - "Exhaust Manifold") |
| 9. |
Engine jack oil pan (A) to be installed .
|


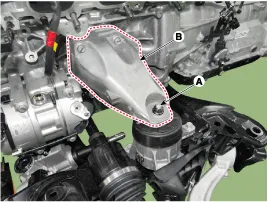
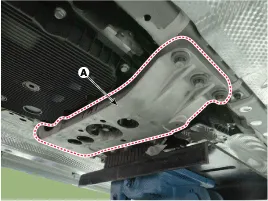
| 10. |
Remove the upper nut (A) of the LH engine mounting insulator, and then remove the mounting support bracket (B).
|
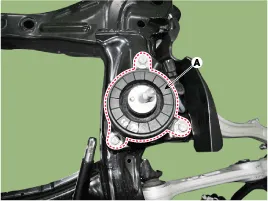
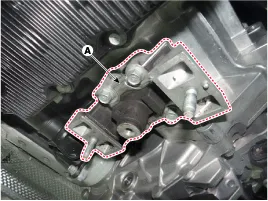
| 11. |
Remove the engine mounting insulator (A).
|
| 12. |
To install, reverse the removal procedure. |
RH Engine Mounting Insulator
| 1. |
Disconnect the negative (-) battery terminal from the trunk room. |
| 2. |
Remove the engine cover. |
| 3. |
Remove the engine room cover and the radiator grill upper cover.
(Refer to Engine And Transaxle Assembly - "Engine Cover") |
| 4. |
Remove the air cleaner.
(Refer to Intake And Exhaust System - "Air Cleaner") |
| 5. |
Remove the engine under cover. |
| 6. |
Remove the water outlet pipe.
(Refer to Cooling System - Water Temperature Control Assembly") |
| 7. |
Remove the exhaust manifold.
(Refer to Intake and Exhaust System - "Exhaust Manifold") |
| 8. |
Engine jack oil pan (A) to be installed.
|
| 9. |
Remove the upper nut (A) of the RH engine mounting insulator, and then remove the mounting support bracket (B).
|

| 10. |
Remove the RH engine mounting insulator (A).
|
| 11. |
To install, reverse the removal procedure. |
Transmission Mounting Insulator
| 1. |
Disconnect the negative (-) battery terminal from the trunk room. |
| 2. |
Remove the engine under cover. |
| 3. |
Using a jack support the transmission assembly. |
| 4. |
Remove the transmission mounting bracket (A).
|
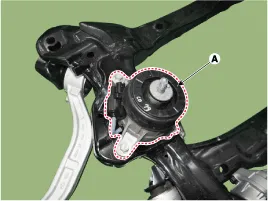
| 5. |
Remove the transmission mounting insulator (A).
|
| 6. |
To install, reverse the removal procedure. |
Components [2WD] 1. Engine mounting insulator assembly2. Engine support bracket LH3. Engine support bracket RH4. Transmission mounting insulator [AWD] 1.
Other information:
Hyundai Genesis (DH) 2013-2016 Service Manual: Compressor Repair procedures
Removal 1. If the compressor is marginally operable, run the engine at idle speed, and let the air conditioning work for a few minutes, then shut the engine off. 2. Disconnect the negative (-) battery terminal. 3. Remove the engine room cover.
Hyundai Genesis (DH) 2013-2016 Service Manual: Heater & A/C Control Unit Components and Components Location
C
Categories
- Manuals Home
- Hyundai Genesis Owners Manual
- Hyundai Genesis Service Manual
- General Information
- Steering System
- Description and Operation
- New on site
- Most important about car

Copyright © 2026 www.hgenesisdh.com - 0.0247