Hyundai Genesis (DH): Evaporative Emission Control System / Canister Repair procedures
Hyundai Genesis (DH) 2013-2016 Service Manual / Emission Control System / Evaporative Emission Control System / Canister Repair procedures
| Removal |
| 1. |
Turn the ignition switch OFF and disconnect the negative (-) battery cable. |
| 2. |
Remove the rear-left wheel & tire and house cover. |
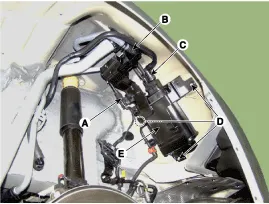
| 3. |
Disconnect the canister close valve connector (A). |
| 4. |
Disconnect the vent hose quick-connector (B). |
| 5. |
Disconnect the vapor hose quick-connector (C). |
| 6. |
Remove the canister assembly (E) after loosening the install nut (D)
|
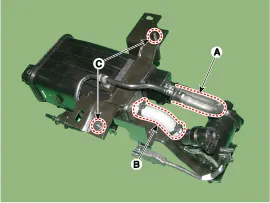
| 7. |
Disconnect the vapor tube (A,B). |
| 8. |
Remove the canister from protector after loosening the fixing nut (C).
|

| Inspection |
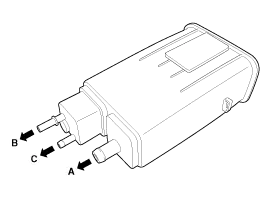
| 1. |
Check for the following items visually.
A: Canister - Atmosphere (via Fuel Tank Air Filter)
B: Canister - Fuel Tank
C: Canister - Intake Manifold
|
| Installation |
| 1. |
To install, reverse the removal procedure. |
Canister installation bolt :
19.6 ~ 29.4 N.m (2.0 ~ 3.0 kgf.m, 14.5 ~21.7 lb-ft)
Canister band installation nut :
3.9 ~ 5.9 N.m (0.4 ~ 0.6 kgf.m, 2.9 ~4.3 lb-ft)
Canister service cover installation bolt :
7.8 ~ 11.8 N.m (0.8 ~ 1.2 kgf.m, 5.8 ~8.7 lb-ft)
Vapor hose connector assembly installation bolt :
3.9 ~ 5.9 N.m (0.4 ~ 0.6 kgf.m, 2.9 ~4.3 lb-ft)
Fuel tank pressure sensor installation bolt:
3.9 ~ 5.9 N.m (0.4 ~ 0.6 kgf.m, 2.9 ~4.3 lb-ft)
Canister close valve installation bolt:
3.9 ~ 5.9 N.m (0.4 ~ 0.6 kgf.m, 2.9 ~4.3 lb-ft) |
Inspection [System Inspection] 1. Disconnect the vapor hose from the throttle body and connect a vacuum pump to the nipple on the throttle body. 2.
Description A ratchet tightening device on the threaded fuel filler cap reduces the chances of incorrect installation, which would seal the fuel filler.
Other information:
Hyundai Genesis (DH) 2013-2016 Service Manual: Components and Components Location
C
Hyundai Genesis (DH) 2013-2016 Service Manual: Description and Operation
Description System Overview The System offers the following features: - Changing the state of engine ignition and power by using the start button. - Controlling external relays for ACC / IGN1 / IGN2 terminal switching and STARTER, without use of mechanical ignition switch.
Categories
- Manuals Home
- Hyundai Genesis Owners Manual
- Hyundai Genesis Service Manual
- Body Electrical System
- Suspension System
- Brake System
- New on site
- Most important about car

Copyright © 2026 www.hgenesisdh.com - 0.0247