
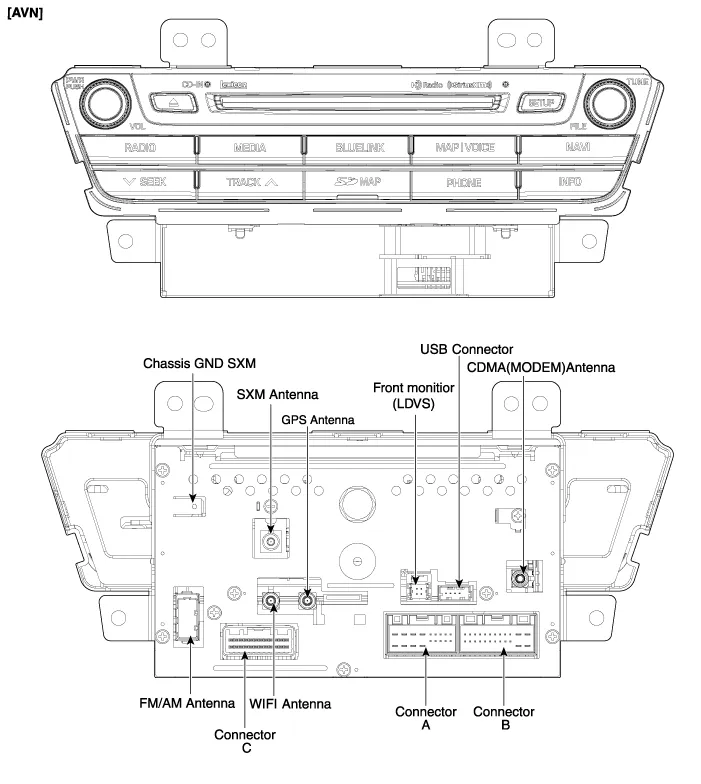
Hyundai Genesis (DH): AVN System / AVN(Audio Video Navigation) head unit Components and Components Location
| Components |
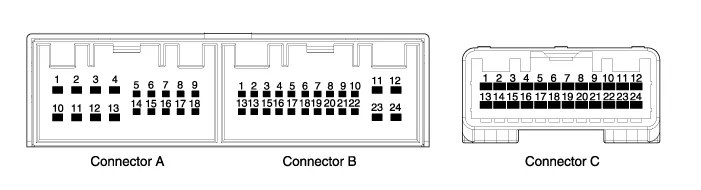
| No. | Connector A | Connector B | Connector C |
| 1 | - | Multmedia-CAN (High) | P-CAN (Low) |
| 2 | - | - | P-CAN (High) |
| 3 | - | - | Monitor touch_CAN (-) |
| 4 | - | - | Monitor touch_CAN (+) |
| 5 | SPDIF Shield GND | - | - |
| 6 | SPDIF (+) | MTS keypad signal | GND |
| 7 | - | AUX jack (Video) | Camera_C |
| 8 | Illumination (+) | AUX R input | Video GND_C |
| 9 | Reverse signal | AUX jack (Shield) | - |
| 10 | - | MIC (+) | - |
| 11 | - | B (+) | Body-CAN (High) |
| 12 | - | B (+) | Body-CAN (Low) |
| 13 | - | Multmedia-CAN (Low) | - |
| 14 | IGN 1 (+) | - | AIRBAG (Modem only) |
| 15 | SPDIF (-) | - | - |
| 16 | - | Vehicle speed | NAVI VOICE (-) |
| 17 | Illumination (-) | MTS keypad (GND) | NAVI VOICE (+) |
| 18 | Antenna B(+) | ACC | - |
| 19 | ? | AUX jack (Shield) | - |
| 20 | AUX jack (Detect) | - | |
| 21 | AUX L input | GND | |
| 22 | MIC (-) | Video GND_Y | |
| 23 | GND | Camera_Y | |
| 24 | GND | Carmera B(+) |
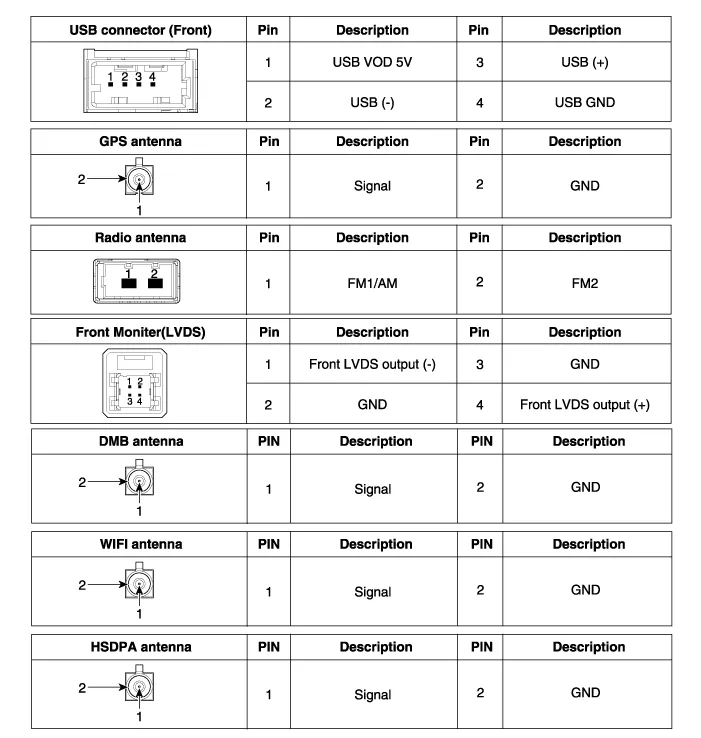
Description AVN system The AVN system has improved information search and easiness of manipulation for the driver by simplifying the system operation experience and unifying the display of the user information such as multimedia, air-conditioning and car information.
Removal - Take care not to scratch the crash pad and related parts. - Eject all discs before removing the AVN head unit not to damage the DVD player
Other information:
Hyundai Genesis (DH) 2013-2016 Service Manual: In-car Sensor Repair procedures
I
Hyundai Genesis (DH) 2013-2016 Service Manual: Mode Control Actuator Repair procedures
Inspection 1. Turn the ignition switch OFF. 2. Disconnect the mode control actuator connector. 3. Verify that the mode control actuator operates to the defrost mode when connecting 12V to terminal 3 and grounding terminal 4. Verify that the mode control actuator operates to the vent mode when connected in reverse.
Categories
- Manuals Home
- Hyundai Genesis Owners Manual
- Hyundai Genesis Service Manual
- Suspension System
- 4 Wheel Drive (AWD) System
- Restraint
- New on site
- Most important about car
