Hyundai Genesis (DH): Lighting System / Hazard Lamp Switch Repair procedures
Hyundai Genesis (DH) 2013-2016 Service Manual / Body Electrical System / Lighting System / Hazard Lamp Switch Repair procedures
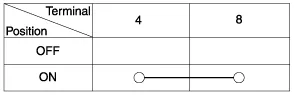
| Inspection |
| 1. |
Check for continuity between terminals. If the continuity is not as specified, replace the hazard lamp switch.
|
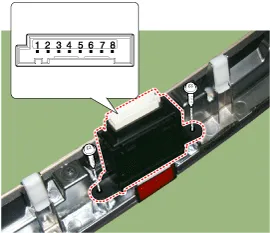
| Removal |
Removal 1. Disconnect the negative (-) battery terminal. 2. Remove the front door trim. (Refer to Body - "Front Door Trim") 3. Disconnect the door mood lamp connectors (A). Components Other information:Hyundai Genesis (DH) 2013-2016 Service Manual: Auto Light Sensor Repair proceduresRemoval 1. Disconnect the negative (-) battery terminal. 2. Remove the photo & auto light sensor. (Refer to Windshield Wiper/Washer - "Rain Sensor") Installation 1. Install the auto light sensor. 2. Connect the negative (-) battery terminal. Hyundai Genesis (DH) 2013-2016 Service Manual: Compressor Components and Components LocationC Categories

Copyright © 2026 www.hgenesisdh.com - 0.0276
|
