Hyundai Genesis: Front Door / Front Door Module Repair procedures
Hyundai Genesis (DH) 2013-2016 Service Manual / Body (Interior and Exterior) / Front Door / Front Door Module Repair procedures
| Replacement |
| 1. |
Remove the front door window glass.
(Refer to Front Door - "Front Door Window Glass") |
| 2. |
Remove the front door outside handle.
(Refer to Front Door - "Front Door Outside Handle") |
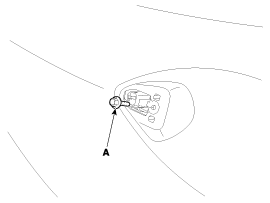
| 3. |
Loosen the front door outside handle base mounting bolt (A).
|
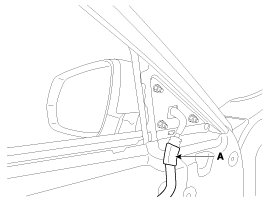
| 4. |
Disconnect the outside rear view mirror connector (A).
|
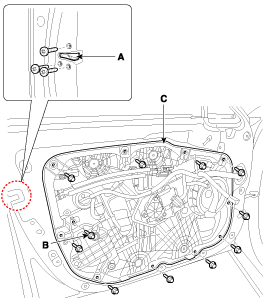
| 5. |
Loosen the front door module mounting bolts and latch (A)
mounting screws. After unscrewing the lower channel screw (B) as loosely
as possible, remove the front door module (C).
|
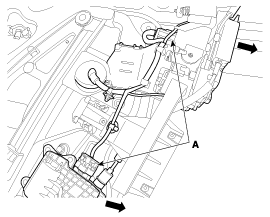
| 6. |
Disconnect the connectors (A) and front door module wiring harness.
|
| 7. |
Remove the front door latch assembly.
(Refer to Front Door - "Front Door Latch") |
| 8. |
Remove the front speaker.
(Refer to Body Electrical System - "Speakers") |
| 9. |
Remove the front power window motor.
(Refer to Body Electrical System - "Power Window Motor") |
| 10. |
Install in the reverse order of removal.
|

 Front Door Module Components and Components Location
Component Location
1. Front door module
...
 Front Door Outside Handle Components and Components Location
Component Location
1. Front door outside handle
...
Other information:
Hyundai Genesis (DH) 2013-2016 Owners Manual: Warning light and message
When the AEB system is turned off, the AEB warning light turns on. (Warning message does not come on.) If the sensor or cover is dirty or obscured with foreign matter such as snow, the AEB warning light and message comes on. In this case, the AEB system may not functio ...
Hyundai Genesis (DH) 2013-2016 Owners Manual: Selecting a Child Restraint System (CRS)
When selecting a CRS for your child, always: Make sure the CRS has a label certifying that it meets applicable Federal Motor Vehicle Safety Standards (FMVSS 213). Select a child restraint based on your child’s height and weight. The required label or the instructions for ...
© 2013-2025 www.hgenesisdh.com
