Hyundai Genesis (DH): Engine And Transaxle Assembly / Engine Mounting Repair procedures
Hyundai Genesis (DH) 2013-2016 Service Manual / Engine Mechanical System / Engine And Transaxle Assembly / Engine Mounting Repair procedures
| Removal and Installation |
LH Engine Mounting Insulator
| 1. |
Disconnect the negative (-) battery terminal from the trunk room. |
| 2. |
Remove the engine cover. |
| 3. |
Remove the engine under cover. |
| 4. |
Remove the engine room cover and radiator grille upper cover.
(Refer to Engine And Transaxle Assembly - "Engine Cover") |
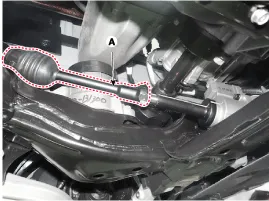
| 5. |
Remove the steering joint mounting bolts (A).
(Refer to Steering System - "Steering Column and Shaft")
|
| 6. |
Remove the engine oil level gauge.
(Refer to Lubrication System - "Oil Level Gauge & Pipe") |
| 7. |
Remove the water inlet pipe .
(Refer to Cooling System - Water Temperature Control Assembly") |
| 8. |
Remove the exhaust manifold.
(Refer to Intake and Exhaust System - "Exhaust Manifold") |
| 9. |
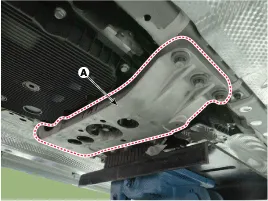
Engine jack oil pan (A) to be installed .
|


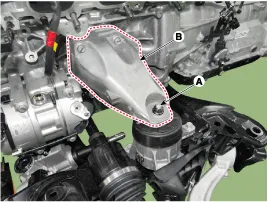
| 10. |
Remove the upper nut (A) of the LH engine mounting insulator, and then remove the mounting support bracket (B).
|
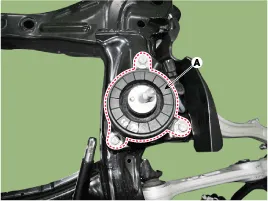
| 11. |
Remove the engine mounting insulator (A).
|
| 12. |
To install, reverse the removal procedure. |
RH Engine Mounting Insulator
| 1. |
Disconnect the negative (-) battery terminal from the trunk room. |
| 2. |
Remove the engine cover. |
| 3. |
Remove the engine room cover and the radiator grill upper cover.
(Refer to Engine And Transaxle Assembly - "Engine Cover") |
| 4. |
Remove the air cleaner.
(Refer to Intake And Exhaust System - "Air Cleaner") |
| 5. |
Remove the engine under cover. |
| 6. |
Remove the water outlet pipe.
(Refer to Cooling System - Water Temperature Control Assembly") |
| 7. |
Remove the exhaust manifold.
(Refer to Intake and Exhaust System - "Exhaust Manifold") |
| 8. |
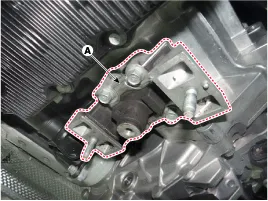
Engine jack oil pan (A) to be installed.
|
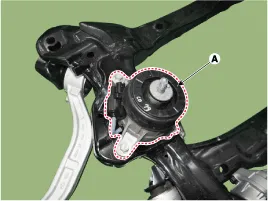
| 9. |
Remove the upper nut (A) of the RH engine mounting insulator, and then remove the mounting support bracket (B).
|

| 10. |
Remove the RH engine mounting insulator (A).
|
| 11. |
To install, reverse the removal procedure. |
Transmission Mounting Insulator
| 1. |
Disconnect the negative (-) battery terminal from the trunk room. |
| 2. |
Remove the engine under cover. |
| 3. |
Using a jack support the transmission assembly. |
| 4. |
Remove the transmission mounting bracket (A).
|
| 5. |
Remove the transmission mounting insulator (A).
|
| 6. |
To install, reverse the removal procedure. |
Components [2WD] 1. Engine mounting insulator assembly2. Engine support bracket LH3. Engine support bracket RH4. Transmission mounting insulator [AWD] 1.
Other information:
Hyundai Genesis (DH) 2013-2016 Service Manual: Components and Components Location
C
Hyundai Genesis (DH) 2013-2016 Service Manual: Compressor oil Repair procedures
Oil Specification 1. The HFC-134a system requires synthetic (PAG) compressor oil whereas the R-12 system requires mineral compressor oil. The two oils must never be mixed. 2. Compressor (PAG) oil varies according to compressor model. Be sure to use oil specified for the compressor model.
Categories
- Manuals Home
- Hyundai Genesis Owners Manual
- Hyundai Genesis Service Manual
- Active Air Flap(AAF) Repair procedures
- Body Electrical System
- Repair procedures
- New on site
- Most important about car

Copyright © 2026 www.hgenesisdh.com - 0.0286