Hyundai Genesis: Engine Control System / Camshaft Position Sensor (CMPS) Repair procedures
Hyundai Genesis (DH) 2013-2016 Service Manual / Engine Control / Fuel System / Engine Control System / Camshaft Position Sensor (CMPS) Repair procedures
| Inspection |
| 1. |
Check the signal waveform of the CMPS and CKPS using the GDS.
|
| Removal |
| [Bank 1] |
|

| 1. |
Turn the ignition switch OFF and disconnect the battery negative (-) cable. |
| 2. |
Remove the intake hose.
(Refer to Engine Mechanical System - "Intake And Exhaust System") |
| 3. |
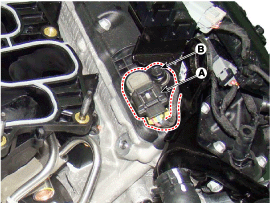
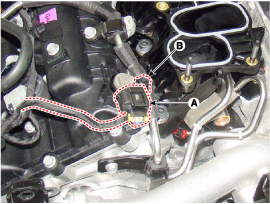
Disconnect the camshaft position sensor connector (A). |
| 4. |
Remove the installation bolt (B), and then vertically remove the sensor from the cylinder head.
[Bank 1 / Intake]
[Bank 1 / Exhaust]
|

| [Bank 2] |
|
| 1. |
Turn the ignition switch OFF and disconnect the battery negative (-) cable. |
| 2. |
Remove the surge tank.
(Refer to Engine Mechanical System - "Surge Tank") |
| 3. |
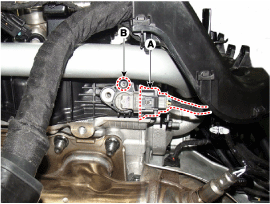
Disconnect the camshaft position sensor connector (A). |
| 4. |
Remove the installation bolt (B), and then vertically remove the sensor from the cylinder head.
[Bank 2 / Intake]
[Bank 2 / Exhaust]
|
| Installation |
|

|
|
|
| 1. |
To install, reverse the removal procedure.
|
 Camshaft Position Sensor (CMPS) Schematic Diagrams
Circuit Diagram
...
 Knock Sensor (KS) Description and Operation
Description
Knocking is a phenomenon characterized by undesirable
vibration and noise and can cause engine damage. The two Knock Sensors
(KS) are installed inside the V-valley of the cylinder b ...
Other information:
Hyundai Genesis (DH) 2013-2016 Service Manual: Rain Sensor Description and Operation
Description Integrated Rain Sensor Integrated rain sensor (A) controls three systems: front wiper, auto-light, and central air conditioner. 1. Wiper Control System When "AUTO" switch signal is received from the multi-function switch on the right, the integrated rain sensor detects the amo ...
Hyundai Genesis (DH) 2013-2016 Service Manual: Rear Driveshaft (VL-VL TYPE) Repair procedures
Replacement [LAMMDA] 1. Loosen the wheel nuts slightly. Raise the vehicle, and make sure it is securely supported. 2. Remove the rear wheel and tire from the rear hub. Be careful not to damage the hub bolts when removing the rear wheel and tire. 3. Remove the sp ...
© 2013-2025 www.hgenesisdh.com
