Hyundai Genesis (DH): Charging System / Battery Repair procedures

Removal
1.
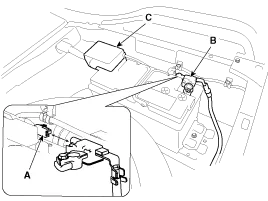
Disconnect the battery sensor connector (A), battery negative terminal (B) and positive terminal (C).

2.
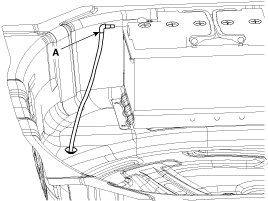
Disconnect the vent hose connector (A) from the battery air vent hole.

3.
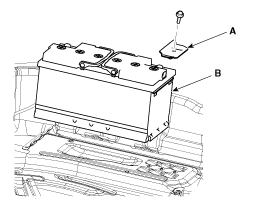
Remove the mounting bracket (A) and then remove the battery (B).

Installation
1.
Install in the reverse order of removal.

Battery (-)terminal installation:
4.0 ~ 6.0 N.m (0.4 ~ 0.6 kgf.m, 3.0 ~ 4.4 lb-ft)
Battery (+)terminal installation:
7.8 ~ 9.8 N.m (0.8 ~ 1.0 kgf.m, 5.8 ~ 7.2 lb-ft)
Battery mounting bracket and the insulation pad installation:
8.8 ~ 13.7 N.m (0.9 ~ 1.4 kgf.m, 6.5 ~ 10.1 Ib-ft)


    Specifications ?AGM105L-DIN ItemSpecificationModel typeAGM105L-DIN Cold Cranking Amperage (A)950 (SAE) / 760 (EN) Reserve Capacity (Min)190

    Troubleshooting

    Other information:

    Hyundai Genesis (DH) 2013-2016 Service Manual: Auto Head Lamp Leveling Unit Troubleshooting

    Inspection with GDS Initialization and diagnosis sequence by using GDS equipment. The following is the summarized A/S procedure. NoProcedure1Park the vehicle on level ground2Tire check3IGN1 ON4Head lamp Low Beam ON5Connection with diagnostic tool6Initial command by diagnostic tool7Clear DTC Code8IGN1 OFF > ON9Re- Connection with diagnostic t

    Hyundai Genesis (DH) 2013-2016 Service Manual: Photo Sensor Repair procedures

    Inspection 1. Turn the ignition switch ON. 2. Connect the GDS. 3. Emit intensive light toward the photo sensor using a lamp, and check the output voltage change. 4. The voltage will rise with higher intensive light and fall with lower intensive light.

    Categories

     
    Copyright В© 2026 www.hgenesisdh.com - 0.0306