Hyundai Genesis (DH): Engine Control System / Fuel Tank Pressure Sensor (FTPS) Repair procedures
Hyundai Genesis (DH) 2013-2016 Service Manual / Engine Control / Fuel System / Engine Control System / Fuel Tank Pressure Sensor (FTPS) Repair procedures
| Inspection |
| 1. |
Connect the GDS on the Data Link Connector (DLC ). |
| 2. |
Measure the output voltage of the FTPS.
|
| Removal |
| 1. |
Turn the ignition switch OFF and disconnect the negative (-) battery cable. |
| 2. |
Fold the rear seat cushion. |
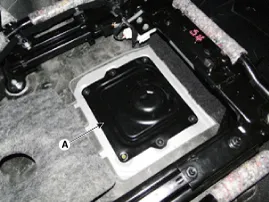
| 3. |
Remove the sub fuel sender service cover (A) after removing installation screw.
|
| 4. |
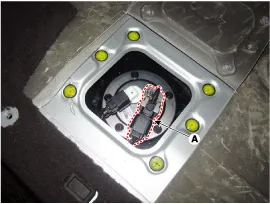
Disconnect the fuel tank pressure sensor connector (A). |
| 5. |
Remove the fuel tank pressure sensor from the sub fuel sender after loosening nut.
|
| Installation |
Circuit Diagram Description Based on information from various sensors, the ECM can calculate the fuel amount to be injected. The fuel injector is a solenoid-operated valve and the fuel injection amount is controlled by length of injection time. Other information:Hyundai Genesis (DH) 2013-2016 Service Manual: Rheostat Repair proceduresInspection 1. Disconnect the negative (-) battery terminal. 2. Remove the crash pad lower panel. (Refer to Body - "Crash Pad Lower Panel") 3. Remove the lower crash pad switch assembly (A) after disengaging the mounting clip. 4. Remove the rheostat switch connector (A). Hyundai Genesis (DH) 2013-2016 Service Manual: Components and Components LocationC Categories

Copyright © 2026 www.hgenesisdh.com - 0.0252
|
