Hyundai Genesis: Premium AVN System / AVN Antenna Repair procedures
Hyundai Genesis (DH) 2013-2016 Service Manual / Body Electrical System / Premium AVN System / AVN Antenna Repair procedures
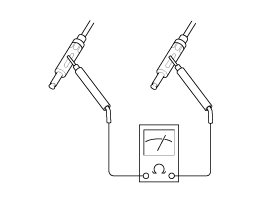
| Inspection |
Glass Antenna Test
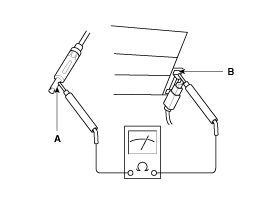
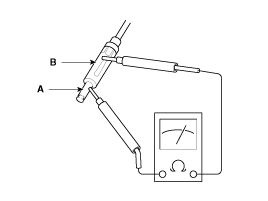
| 1. |
Wrap aluminum foil (A) around the tip of the tester probe (B)
and move the probe along the grid line to check whether the circuit
opens.
|

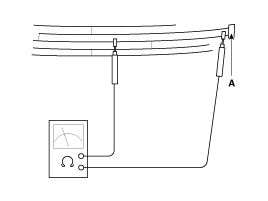
| 2. |
Bring one end of the tester probe into contact with the glass
antenna terminal (A) while moving the other end along the antenna wires
to check for continuity.
|
Glass Antenna Repair
To make an effective repair, the broken section must be no longer than one inch. |

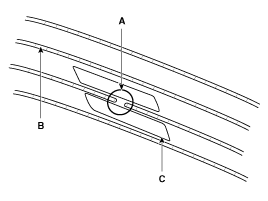
| 1. |
Lightly rub the area around the broken section (A) with fine
steel wool, and then clean it with alcohol with the masking tape
attached as shown below.
|
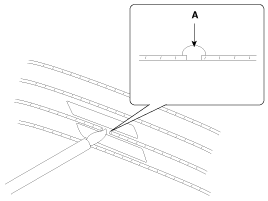
| 2. |
Mix conductive paint with thinner and apply the mixture three times at an interval of 15 minutes. |
| 3. |
Before supplying power, take the masking tape off. For a
refined finish, remove the extra paint with a knife after the paint
dries up (for about 1 day).
|
| 4. |
Check for continuity in the repaired wire. |
Glass Antenna Circuit Inspection
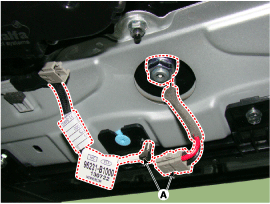
| 1. |
Remove the right rear quarter trim glass antenna, and then disconnect the power wiring from the amplifier. |
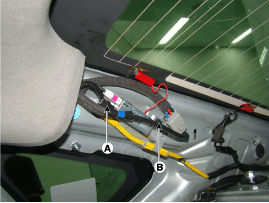
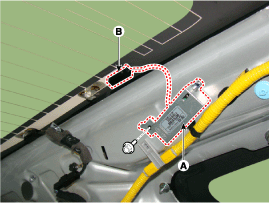
| 2. |
Turn the radio ON.
Measure the voltage between terminal 2 of the harness side feeder cable (A) and body ground (B).
|
| 3. |
Using the tester, measure the wiring resistance value of AM between 1 and 2.
|
| 4. |
Using the tester, measure the wiring resistance value of FM between A and B.
|
| 5. |
Check the grid lines for continuity. |
| 6. |
In case that radio reception is poor even after the circuit inspection, replace the glass antenna amp.
If reception quality is not improved, check the radio cable and audio unit. |
Antenna Cable
| 1. |
Check for continuity between the center poles of antenna cable.
|

| 2. |
Check for continuity between the outer poles of antenna cable. There should be continuity.
|
| 3. |
If there is no continuity, replace the antenna cable. |
| 4. |
Check for continuity between the center pole (A) of antenna cable and terminal of glass antenna (B). There should be continuity.
|
| 5. |
If there is no continuity, replace the antenna amplifier. |
| 6. |
Check for continuity between the center pole (A) and outer pole (B) of antenna cable. There should be no continuity.
|
| 7. |
If there is continuity, replace the antenna cable. |
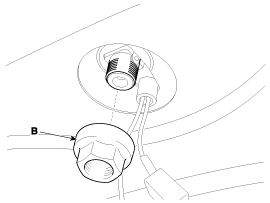
| Removal |
| 1. |
Disconnect the negative (-) battery terminal. |
| 2. |
Remove the roof trim.
(Refer to Body - "Roof Trim Assembly") |
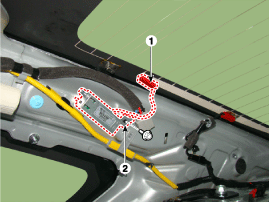
| 3. |
Remove the roof antenna (A) after loosening a nut (B).
|
| Installation |
| 1. |
Connect the roof antenna connectors. |
| 2. |
Install the rear roof trim.
|
 AVN Antenna Components and Components Location
Components
...
 Speakers Repair procedures
Inspection
Troubleshooting of the speakers
When handling the speakers:
-
Do not cause shock to the speakers by dropping or throwing them.
-
Be careful not to drop w ...
Other information:
Hyundai Genesis (DH) 2013-2016 Service Manual: Blind Spot Detection Indicator Components and Components Location
Components 1. AVM Camera2. Ambient temperature sensor3. Puddle lamp ...
Hyundai Genesis (DH) 2013-2016 Service Manual: Auto Head Lamp Leveling Unit Troubleshooting
Inspection with GDS Initialization and diagnosis sequence by using GDS equipment. The following is the summarized A/S procedure. NoProcedure1Park the vehicle on level ground2Tire check3IGN1 ON4Head lamp Low Beam ON5Connection with diagnostic tool6Initial command by diagnostic tool7Clear DTC C ...
© 2013-2025 www.hgenesisdh.com
