Hyundai Genesis: Intake And Exhaust System / Air Cleaner Repair procedures
Hyundai Genesis (DH) 2013-2016 Service Manual / Engine Mechanical System / Intake And Exhaust System / Air Cleaner Repair procedures
| Removal and Installation |
[Air Cleaner Assembly]
| 1. |
Disconnect the battery "-" terminal from the trunk room. |
| 2. |
Remove the engine cover.
(Refer to Engine And Transaxle Assembly - "Engine Cover") |
| 3. |
Remove the engine room cover.
(Refer to Engine And Transaxle Assembly - "Engine Cover") |
| 4. |
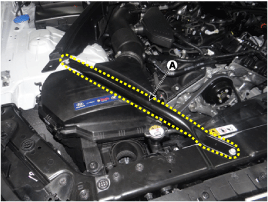
Remove the front strutbar (A).
|
| 5. |
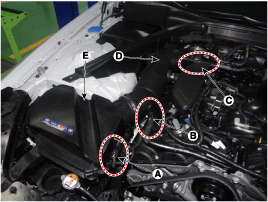
Remove the air intake hose and air cleaner assembly.
|
| 6. |
To install, reverse the removal procedure. |
[Air Cleaner Element]
| 1. |
Disconnect the battery "-" terminal from the trunk room. |
| 2. |
Remove the engine cover. |
| 3. |
Remove the engine room cover.
(Refer to Engine And Transaxle Assembly - "Engine Cover") |
| 4. |
Remove the front strutbar (A).
|
| 5. |
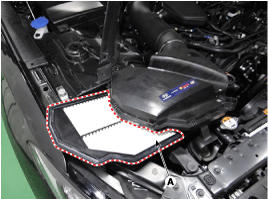
Remove the retaining clips air cleaner cover, and then the air cleaner element (A).
|
| 6. |
To install, reverse the removal procedure. |
 Air Cleaner Components and Components Location
Components
1. Air cleaner cover2. Air cleaner element3. Air cleaner body4. Air intake hose5. Resonator6. Intake air temperature sensor (IATS)
...
 Variable Intake Solenoid(VIS) Actuator Repair procedures
Removal and Installation
1.
Disconnect the battery "-" terminal from the trunk room.
2.
Remove the engine cover.
(Refer to Engine And Transaxle Assembly - "Engine Cover")
3.
Remove the VI ...
Other information:
Hyundai Genesis (DH) 2013-2016 Service Manual: Ignition Coil Description and Operation
Description An ignition coil is an induction coil in an engine's ignition system which transforms the battery's low voltage to the high voltage needed to create an electric spark in the spark plugs to ignite the fuel. Coils have an internal resistor while others rely on a resistor wire or ...
Hyundai Genesis (DH) 2013-2016 Service Manual: Front Seat Back Cover Components and Components Location
Component Location 1. Front seat back cover ...
© 2013-2025 www.hgenesisdh.com


