Hyundai Genesis (DH): Seat Belt Pretensioner / Seat Belt Pretensioner (BPT) Repair procedures
Hyundai Genesis (DH) 2013-2016 Service Manual / Restraint / Seat Belt Pretensioner / Seat Belt Pretensioner (BPT) Repair procedures
| Removal |
| 1. |
Disconnect the battery negative cable, and wait for at least three minutes before beginning work. |
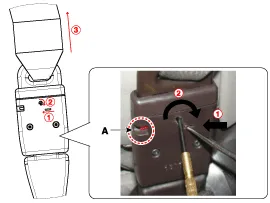
| 2. |
Remove the front anchor seat belt (A).
|
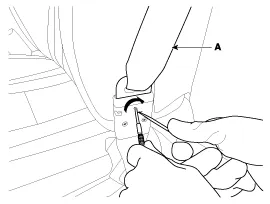


 ) and turn it clockwise.
 ).
).
| 3. |
Remove the center pillar lower trim.
(Refer to Body - "Center Pillar Trim") |
| 4. |
Remove the center pillar upper trim.
(Refer to Body - "Center Pillar Trim") |
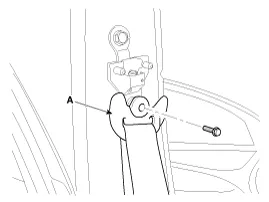
| 5. |
After loosening the mounting bolt, then remove the front seat belt lower anchor (A).
|
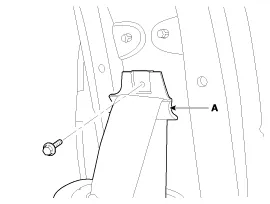
| 6. |
Loosen the front seat belt webbing guide (A) mounting bolts.
|
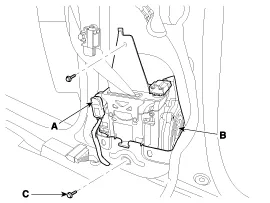
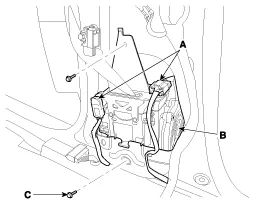
| 7. |
After disconnecting the pretensioner connector lock pin,
remove the front seat belt pretensioner connectors (A), loosen the
mounting bolts, then remove the front seat belt pretensioner (B).
[Genral Type]
[PSB Option Type]
|
| Installation |
| 1. |
Turn the ignition switch OFF. |
| 2. |
Disconnect the battery negative cable and wait for at least three minutes. |
| 3. |
Install in the reverse order of removal. |
| 4. |
Reconnect the battery negative cable. |
| 5. |
After installing the seat belt pretensioner, confirm proper system operation:
Turn the ignition switch ON; the SRS indicator light should turn on for about six seconds and then go off. |
Description The Emergency Fastening Device (EFD) operates at the same time with the Seat Belt Pretensioner when it satisifies the deployment condition after a collision.
Other information:
Hyundai Genesis (DH) 2013-2016 Service Manual: Components and Components Location
C
Hyundai Genesis (DH) 2013-2016 Service Manual: Heater Unit Components and Components Location
Component Location Components (1) 1. Shower duct (Left)2. Mode actuator (LH)3. Temperature control actuator (LH)4. Temperature door lever (Left)5. Mode actuator (A)6. Console temperature actuator (A)7. Console mode actuator ON/OFF8. Heater case (Left)9.
Categories
- Manuals Home
- Hyundai Genesis Owners Manual
- Hyundai Genesis Service Manual
- Electric Parking Brake (EPB) Repair procedures
- Engine Electrical System
- Emission Control System
- New on site
- Most important about car

Copyright © 2026 www.hgenesisdh.com - 0.022